
This post was co-written with Vasiliki Nikolopoulou from Collibra.
Managing metadata across tools and teams is a growing challenge for organizations building modern data and AI platforms. As data volumes grow and generative AI becomes more central to business strategy, teams need a consistent way to define, discover, and govern their datasets, features, and models.
Collibra is a widely adopted data intelligence platform that helps organizations centralize governance workflows, define business glossaries, and enforce policies across data assets. Teams use Collibra to curate business context, classify sensitive data, and manage access to information in line with compliance requirements.
Amazon SageMaker Catalog, part of the next generation of Amazon SageMaker, provides a unified environment where users can register, search, and govern AI and data assets. It allows organizations to organize datasets, trained models, features, and pipelines and apply metadata such as business terms, classifications, ownership, and usage context. Amazon SageMaker Catalog is designed to support collaboration across roles, including data scientists, engineers, and business stakeholders.
As organizations scale their data and AI initiatives, ensuring consistency and trust in metadata becomes increasingly important. Teams need a unified way to manage glossary terms, asset descriptions, classifications, and access governance across platforms. Without this consistency, it becomes difficult to enforce standards, support compliance, and drive collaboration across teams building and consuming data.
To address this challenge, Amazon Web Services (AWS) and Collibra have built a new integrated solution that demonstrates the integration between the Collibra Platform and the next generation of Amazon SageMaker. Developed collaboratively by both companies, the solution is based on the APIs of both products and is designed to help customers explore what’s possible through hands-on testing. It provides a practical example of how metadata synchronization between Collibra and SageMaker can be accomplished in real-world scenarios. With this integration, you can align business and technical metadata across both platforms, so you can extend your governance workflows to AI and analytics assets managed in Amazon SageMaker.
This solution allows metadata to remain consistent across both platforms, regardless of where it was created. It helps reduce duplication, improve metadata quality, and ensure that business context travels with data and AI assets throughout their lifecycle. The integration supports metadata synchronization, glossary term mapping, and access approval workflows using native APIs and automation.
In this post, we take a closer look at the integration, describe the use cases it enables, walk through the architecture, and show how to implement the solution in your environment.
Solution overview
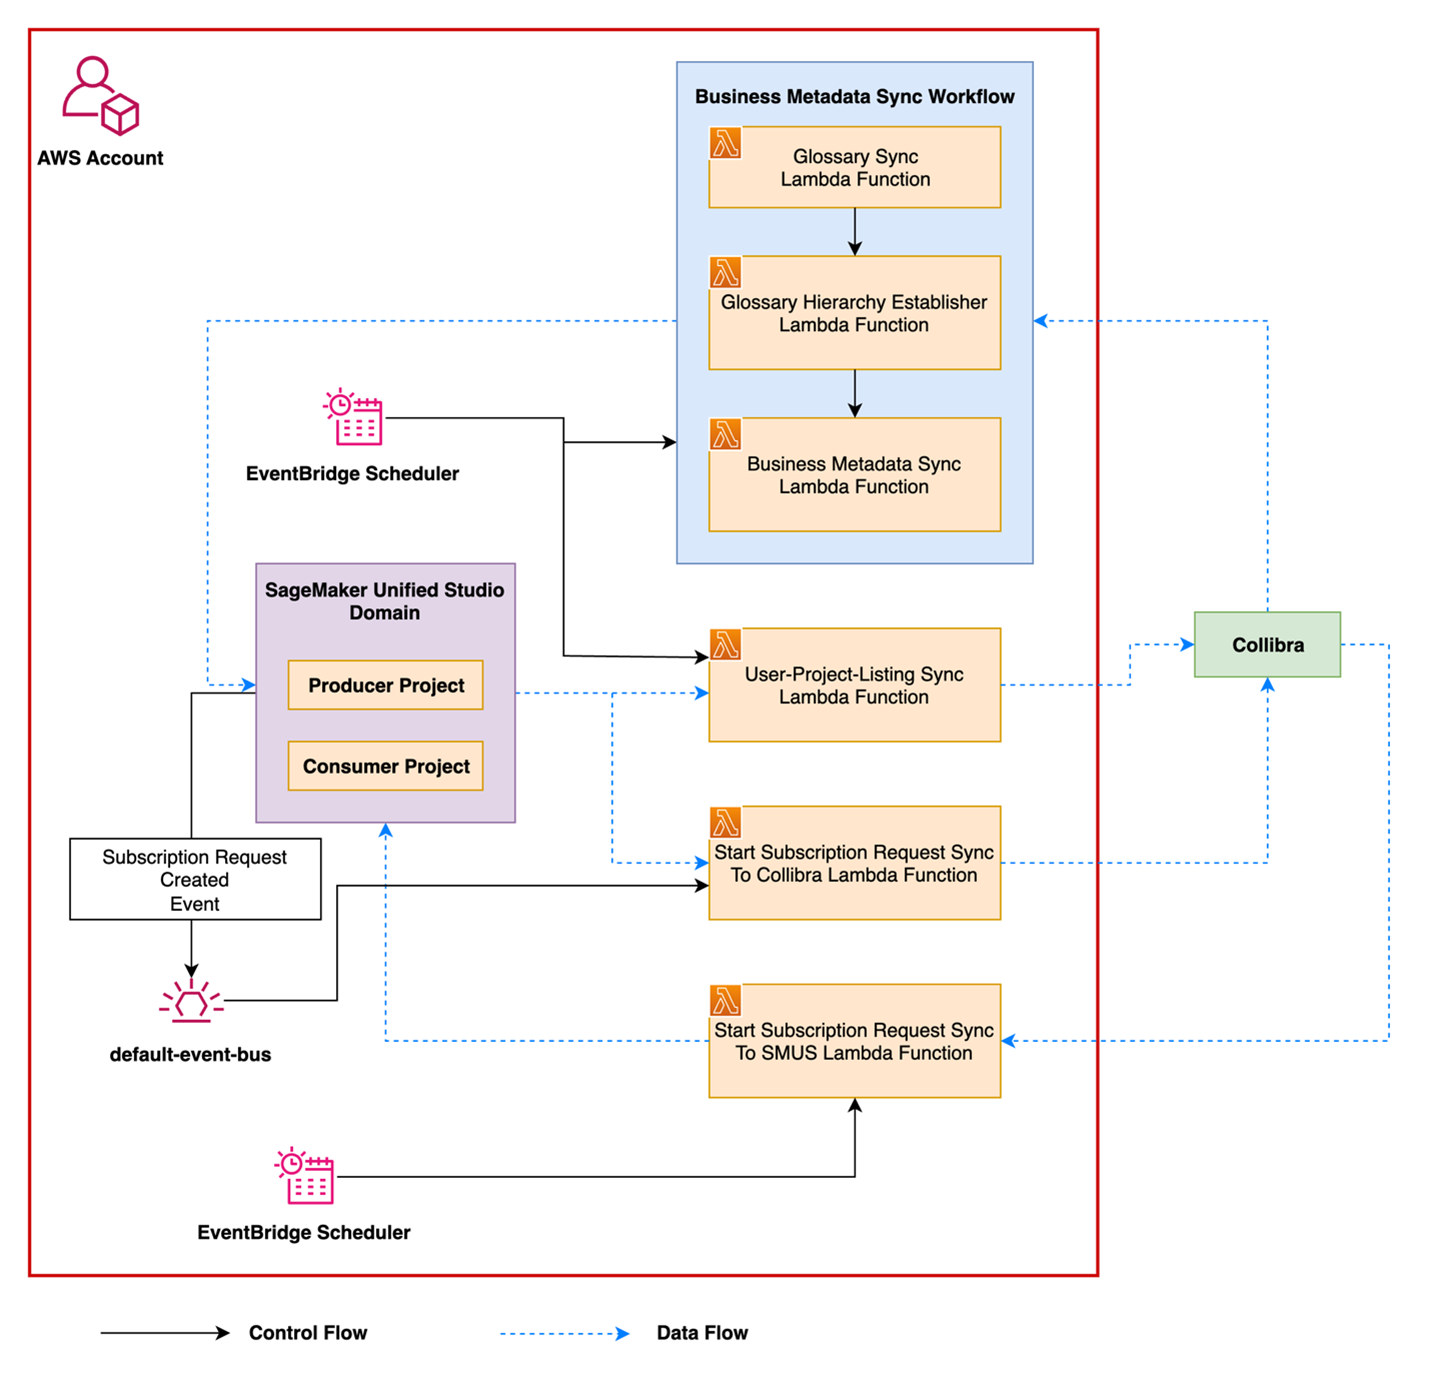
The integration between Amazon SageMaker Catalog and Collibra offers automated, bidirectional metadata synchronization and access governance across both platforms. It’s built using the built-in APIs of Amazon SageMaker and Collibra Data Governance Center (DGC) to provide a scalable and configurable mechanism for metadata exchange. The solution consists of two main capabilities: metadata synchronization and access subscription workflow integration. The following diagram illustrates the solution architecture.
Metadata synchronization
Many organizations manage business and technical metadata across multiple systems. Without synchronization, glossary terms, asset descriptions, and classifications can become inconsistent, leading to duplicated work and misalignment across teams.
This integration allows metadata to flow between Amazon SageMaker Catalog and Collibra, regardless of where it was created. Key elements such as glossary terms, their hierarchy, associated descriptions, and relationships to assets like datasets or columns are automatically synchronized between platforms.
The solution supports:
- Bidirectional synchronization of glossary terms and descriptions
- Preservation of glossary structure, including parent-child relationships
- Association of terms with data assets such as datasets, tables, and columns
- Synchronization of additional business metadata, such as classifications and data categories
- Alignment of technical descriptions for datasets and columns between systems
By keeping metadata consistent, the integration reduces manual work, avoids duplication, and provides users in both platforms with the same trusted context.
Subscription and approval flow
Organizations that rely on Collibra for access governance can now extend those workflows to assets cataloged in Amazon SageMaker. After metadata is synchronized, users can discover and request access to datasets directly from within Collibra, using familiar approval processes.
This integration connects Collibra’s workflow engine with the access control mechanism offered by Amazon SageMaker. When an asset is registered in Amazon SageMaker and shared into Collibra, users can initiate a subscription request in Collibra. When it’s approved, access is granted using Amazon the SageMaker built-in access management, which supports multiple AWS services such as AWS Glue and Amazon Redshift.
Key capabilities include:
- Discovery and access request initiation from Collibra or Amazon SageMaker
- Centralized review and approval processes managed within Collibra
- Access provisioning using the Amazon SageMaker grant mechanism
- Consistent metadata and asset context available throughout the request lifecycle
This flow helps streamline the experience for both business and technical users while keeping access to governed data traceable, auditable, and aligned with organizational policies.
Prerequisites
To perform the solution, you need the following prerequisites:
Walkthrough
The next section provides a walkthrough that shows how the integration works from start to finish. It highlights how a user discovers a data asset, submits a subscription request, and how that request is reviewed, approved, and fulfilled. Throughout the process, metadata and governance policies remain aligned between Collibra and Amazon SageMaker Catalog. This example helps illustrate what the integration enables and how it fits into a typical data access workflow.
Setup on the Collibra environment
To enable this solution, some initial setup is needed in the Collibra environment. This involves configuring the key components that users will need to discover, request, and manage access to data. The following steps outline the basic setup required to support the overall experience.
Operating Model changes and import workflows in Collibra
The operating model of the Collibra instance needs two new asset types and attribute types as well as two new relations and statuses for the scripts and workflows to work properly. These new asset types are recommended because Amazon SageMaker introduces its own concepts and architecture, such as domains and projects. Using the same names in Collibra makes it easier for users to understand and navigate both systems consistently. In the following diagram, the new asset types are shown with dotted lines along with the corresponding new relations, attributes, and statuses.
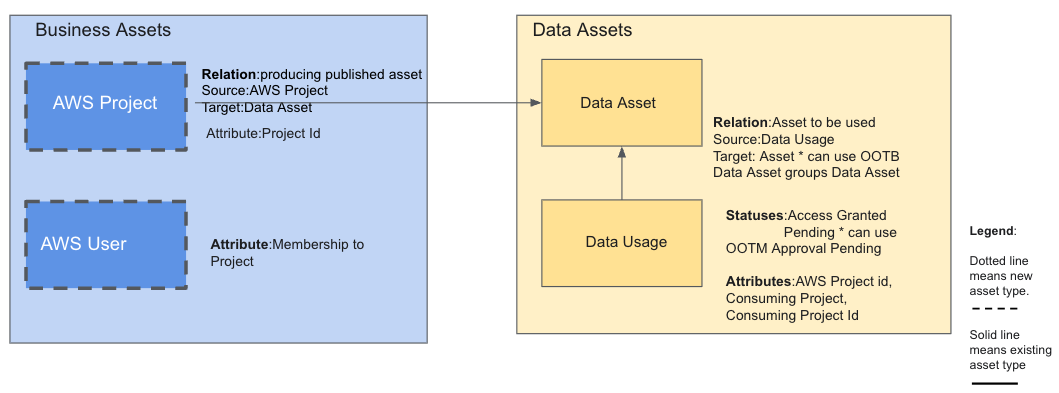
In addition to AWS projects, the implementation requires synchronization of AWS users beyond the standard capabilities. This is necessary because in AWS, a user can’t subscribe to an asset directly as an individual. They can only do so as a member of a project. As a result, when a user subscribes to an asset, they must specify which project they’re subscribing through. To support this behavior, membership to projects information for AWS users needs to be maintained and synchronized within Collibra. AWS project to user mapping needs to be maintained in Collibra, which is accessed by administrative users. The metadata information about AWS user membership to projects can be kept in a Collibra environment or community, which isn’t accessible to anyone except authorized users. Steps for implementation of Collibra operating model changes:
- Go to Settings, then Operating model, and add two new asset types, AWS Project and AWS User.
- In Settings, navigate to Attribute types and add the new attribute types. The new attribute types are: Project id assigned to the AWS Project asset type, Membership to Project assigned to the AWS User, AWS Project id, Consuming Project and Consuming Project Id to be assigned to the existing asset type Data Usage. Refer to the documentation for more details on how to add new attribute types and how to assign them to asset types
- In Settings, go to Relation types and add the Asset to be used relation between asset types data usage and data asset. Refer to the documentation for guidance on how to add a new relation to a pair of asset types.
- In Settings, go to Statuses and add the new statuses, which are Access granted and Pending, to be assigned to the asset type data usage.
- Go back to the Operating model and, for each new asset type, add the newly created relations, attributes, and statuses. Don’t skip this step. If it isn’t completed, the new configurations will won’t take effect.
- Create the following domains:
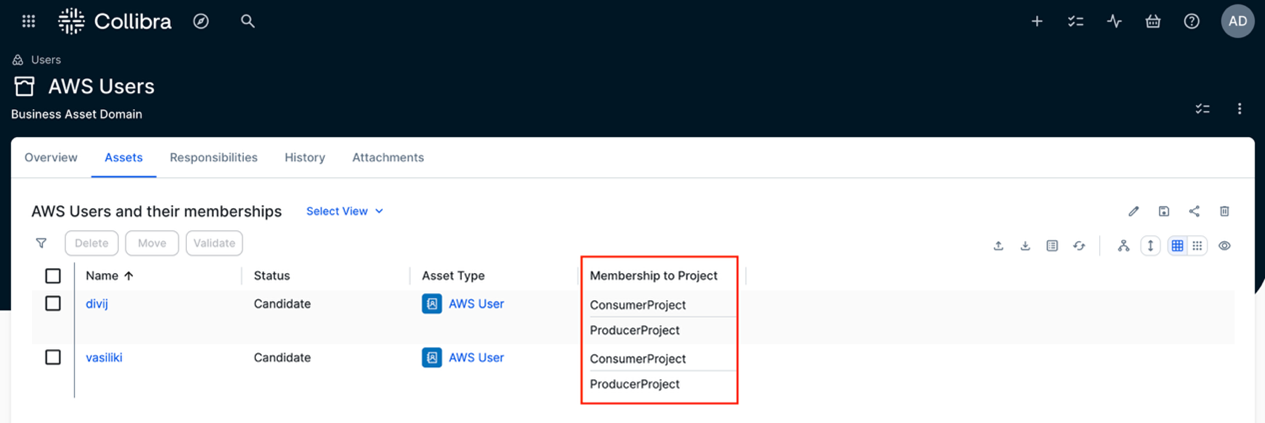
- AWS Users – This is a business asset domain where the metadata for AWS user memberships will be stored. Users and their memberships are automatically imported into Collibra through the solution. An example is shown in the screenshot.
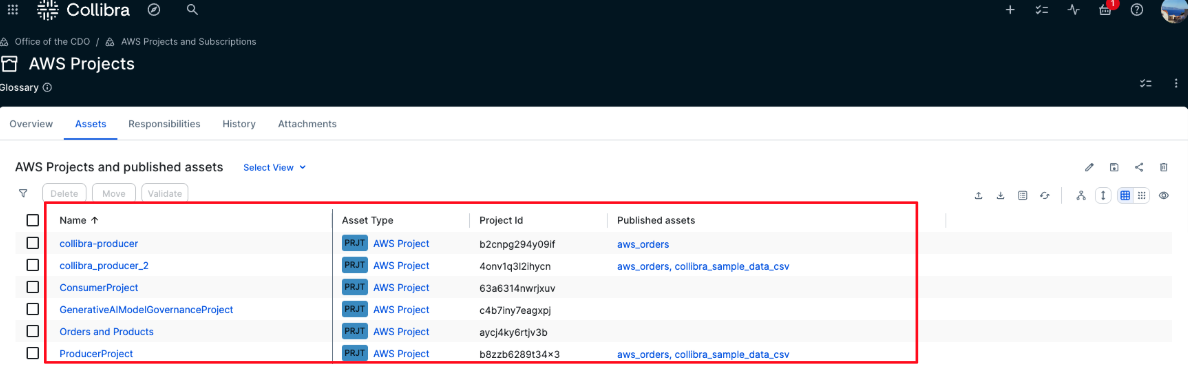
- AWS Projects – This is also a business asset domain where AWS projects and their metadata will be automatically imported. The following screenshot shows an example of such a domain. The AWS projects, along with their published assets, are brought into Collibra through the solution.
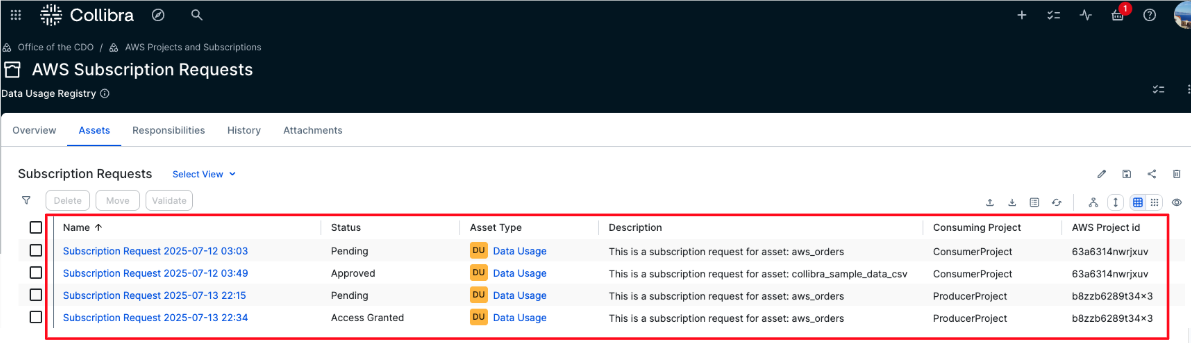
- AWS Subscription Requests – This is a domain of type data usage registry. It will hold all new AWS subscription requests along with their context, such as the consuming project and the subscribed data asset. The status of each request is especially important because it drives the integration workflow that users can use to track the current state of their request.
- AWS Users – This is a business asset domain where the metadata for AWS user memberships will be stored. Users and their memberships are automatically imported into Collibra through the solution. An example is shown in the screenshot.
Workflows installation
This solution includes two workflows: one for managing subscription request approvals and another for notifying users when access is granted.
The first workflow handles the full subscription process. It begins by prompting the user to select the consuming project because only projects the user is a member of are eligible for subscriptions. After it’s selected, a new subscription request asset is created in Collibra with a timestamp, the consuming project details, and a status set to Pending.
An approval task is then assigned to the business steward of the requested data asset. If the steward approves the request, the status changes to Approved. This triggers a notification to the requester and signals the AWS solution to pick up the request and grant access. When access is granted, the status is updated to Access granted.
If the steward rejects the request, the status is changed to Rejected and the requester is notified. No further action is taken in that case.
The second workflow notifies the requester that the access was granted. It’s triggered by the functions in AWS when the subscription grant is completed. The steps to deploy the two workflows are as follows:
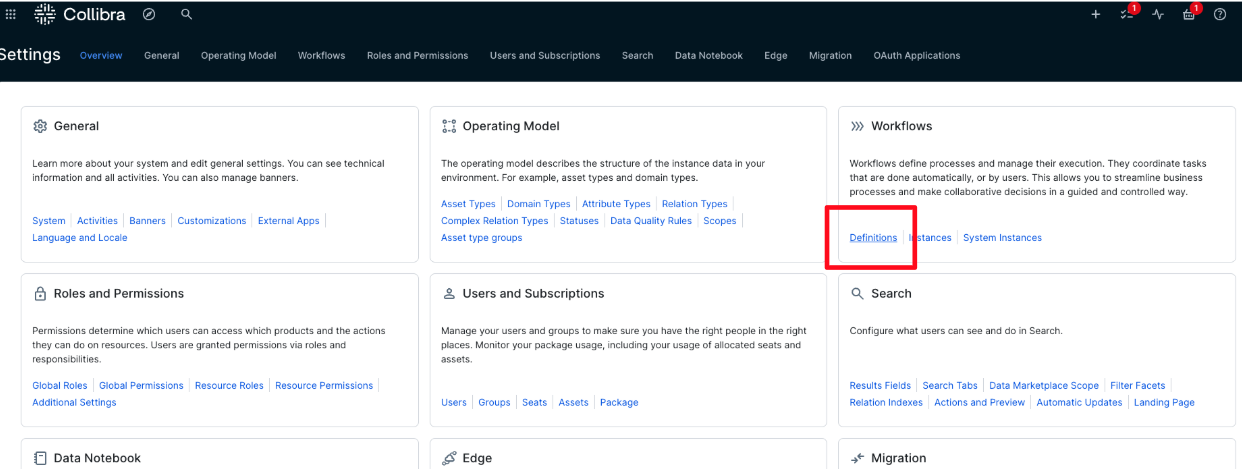
- Go to Settings, then select Workflows followed by Definitions, as shown in the following screenshot.
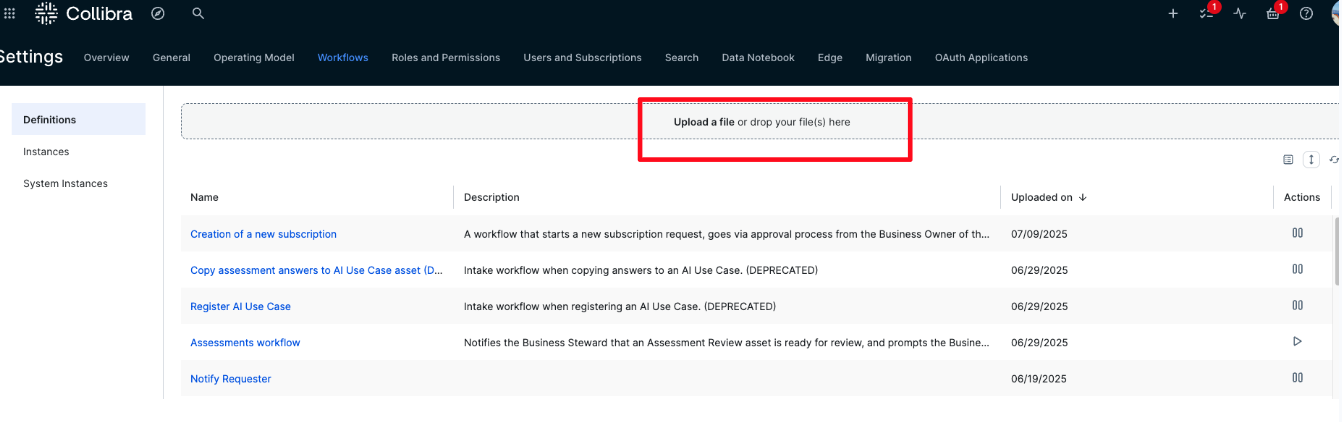
- Choose Upload a file, as shown in the following screenshot. Then, upload both workflow files from the GitHub directory where all the files are provided. In that GitHub directory, there is a directory with the workflow files called Workflows.
- After the workflows are uploaded, complete the following steps for each one, as shown in the following screenshot:
- Enable the workflow by choosing Play. When enabled, the button will display a Pause icon.
- Under Rules, set it to apply to Assets, then choose Add Rules and choose Asset: Table. You can also use Data Asset for a broader scope, but in this case, published assets in AWS are tables.
- Clear This workflow can only run once at the same time on a specific resource. This provides that multiple users can request subscriptions to the same asset simultaneously.

The workflows are now uploaded, enabled, and ready for use.
Add responsibilities
We need to assign business stewards to the ingested AWS assets so that when the workflows are triggered, there is a designated user responsible for approving subscription requests. In this version of the solution, it’s assumed that each asset has only one Business Steward.
To add a Business Steward, follow these steps:
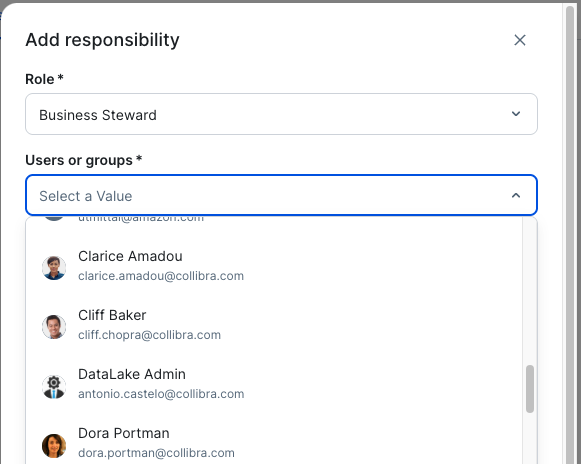
- In the domain or community where the AWS data assets have been ingested using the Edge integration, choose Responsibilities. Then choose Add, as shown in the following screenshot
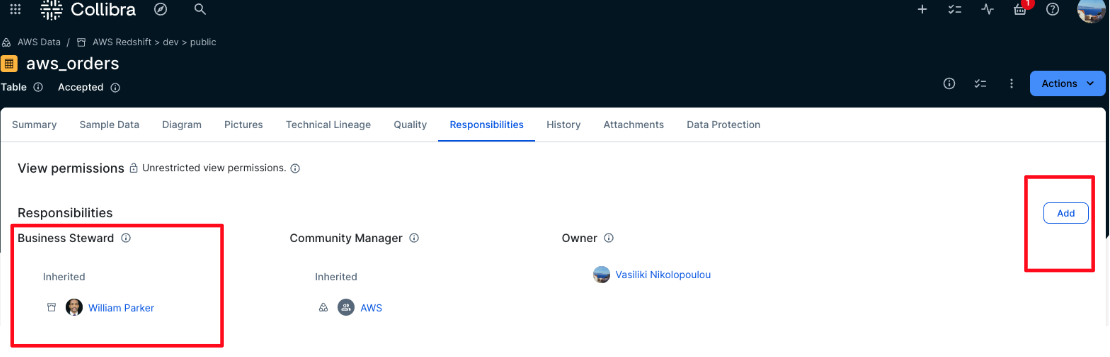
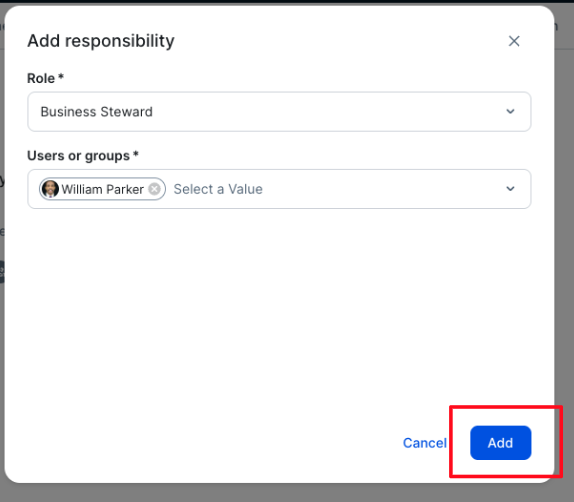
- Choose Business Steward from the Role dropdown list, as shown in the following screenshot. From the Users or groups dropdown list, choose the user who will be responsible for approving subscription requests for these assets. This solution allows only one business steward per asset. You can assign a business steward at the community level, and this way this role will be inherited to all assets under this community.
- Choose Add, as shown in the following screenshot. This will assign the selected user to the Business Steward role for the specified asset, domain, or community of assets.
Setup on the AWS environment
Now that the configuration on the Collibra side is complete, set up the Amazon SageMaker domain that is used for this walkthrough. We provide the following assets to help users set up this solution
- An AWS CloudFormation template in YAML format, called
template.yaml - Instructions to generate a lambda zip file that contains all the scripts that the Cloud Formation will run, called
lambda_build.zip - Instructions to create a secret using AWS Secrets Manager that will store Collibra credentials.
Create the CloudFormation stack
To support this solution, provision a set of AWS resources that facilitate communication between environments and automate key tasks. In this section, we show how to deploy the foundational infrastructure using AWS CloudFormation, which simplifies resource provisioning and provides consistency across environments.
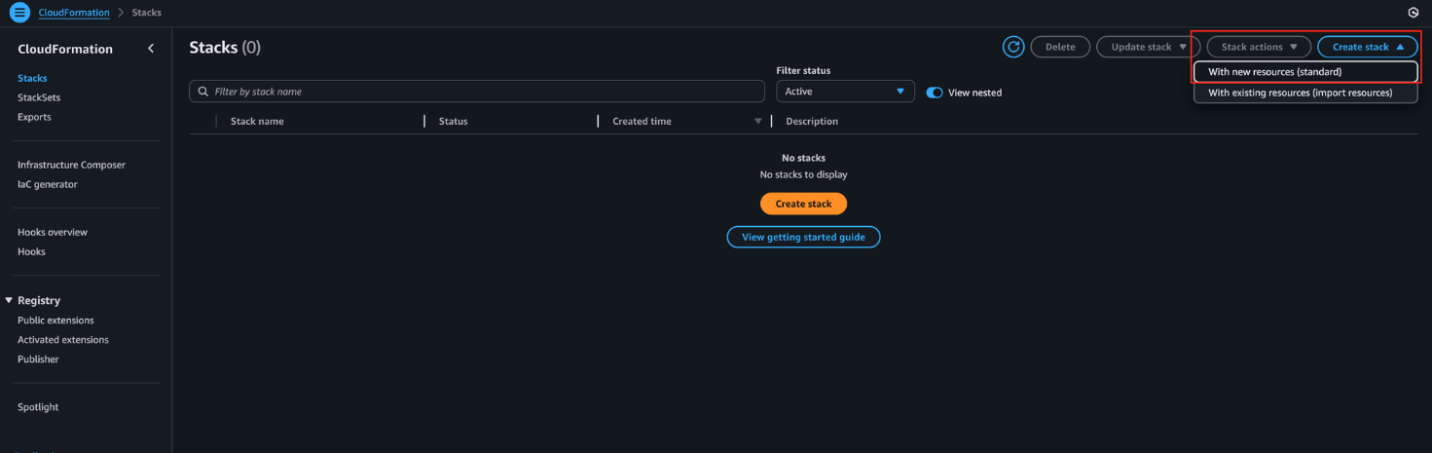
- On the AWS Management Console, navigate to CloudFormation and choose Create stack, then choose With new resources (standard), as shown in the following screenshot.
- Choose the provided CloudFormation template and choose Next.
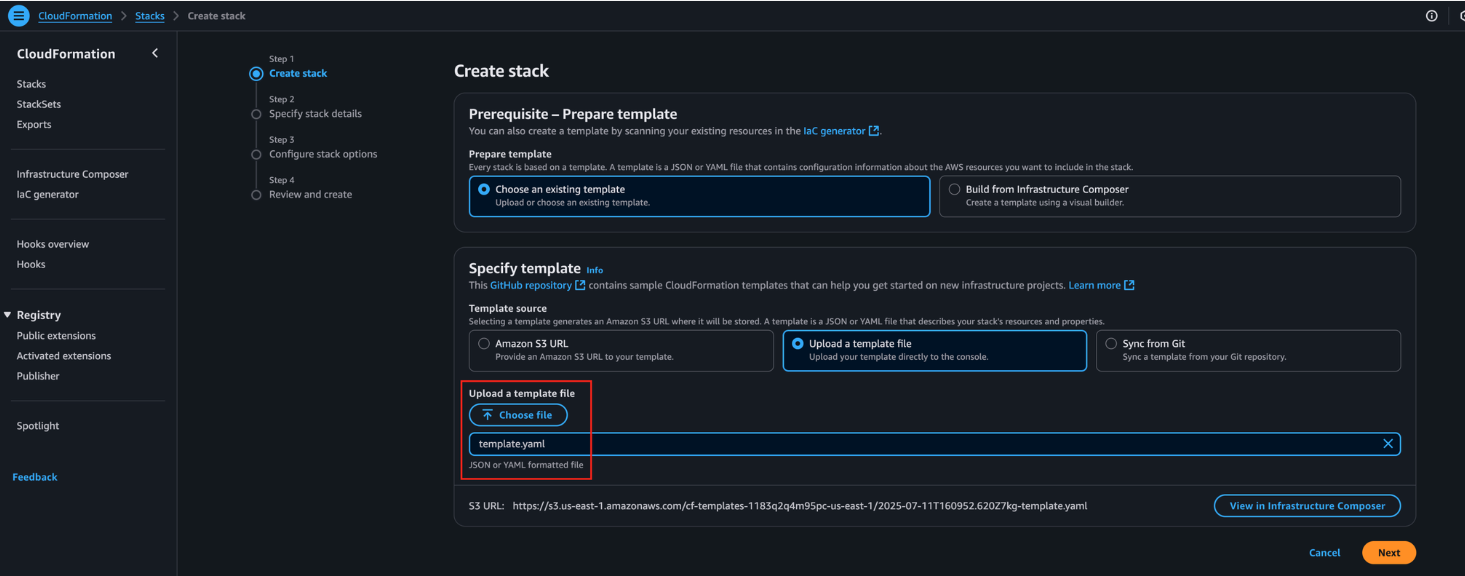
- Enter a name for the stack and complete all required parameters below:
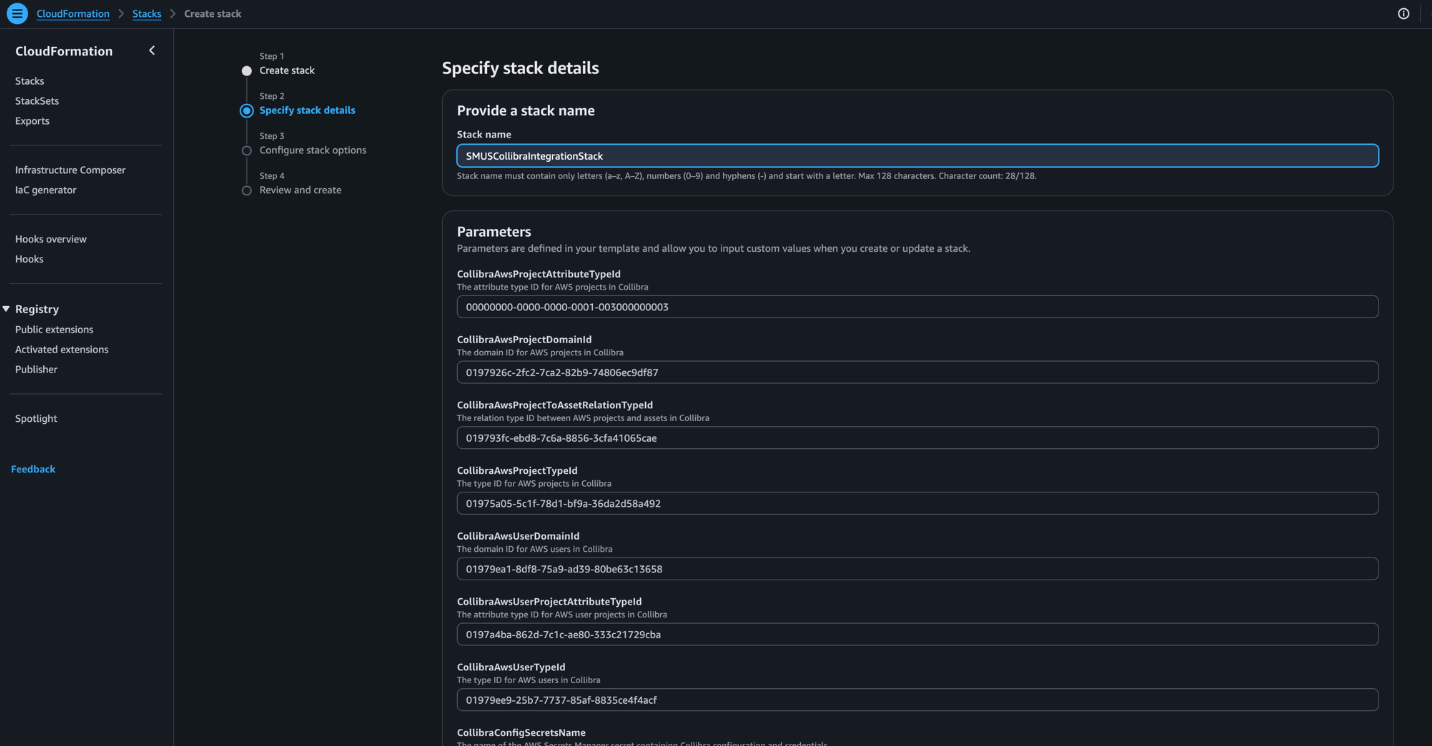
- CollibraAwsProjectAttributeTypeId – The attribute type ID for AWS projects in Collibra.
- CollibraAwsProjectDomainId – The domain ID for AWS projects in Collibra.
- CollibraAwsProjectToAssetRelationTypeId – The relation type ID between AWS projects and assets in Collibra.
- CollibraAwsProjectTypeId – The type ID for AWS projects in Collibra.
- CollibraAwsUserDomainId – The domain ID for AWS users in Collibra.
- CollibraAwsUserProjectAttributeTypeId – The attribute type ID for AWS user projects in Collibra.
- CollibraAwsUserTypeId – The type ID for AWS users in Collibra.
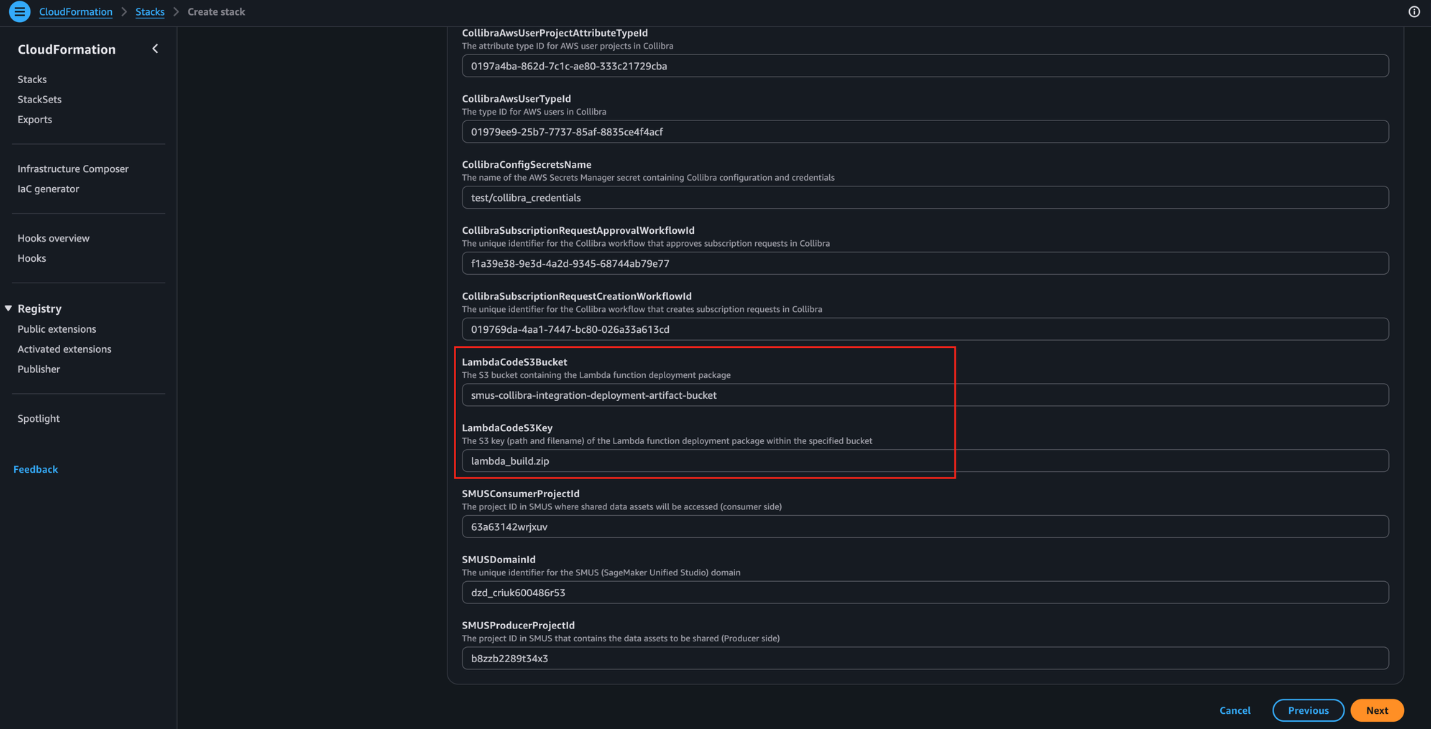
- CollibraConfigSecretsName – The name of the AWS Secrets Manager secret containing Collibra configuration and credentials.
- SMUSProducerProjectId – The project ID in SMUS that contains the data assets to be shared (producer side).
- SMUSConsumerProjectId – The project ID in SMUS where shared data assets will be accessed (consumer side).
- SMUSDomainId – The unique identifier for the SageMaker Unified Studio (SMUS) domain.
- CollibraSubscriptionRequestCreationWorkflowId – The unique identifier for the Collibra workflow that creates subscription requests in Collibra.
- CollibraSubscriptionRequestApprovalWorkflowId – The unique identifier for the Collibra workflow that approves subscription requests in Collibra.
- LambdaCodeS3Bucket – The S3 bucket containing the Lambda function deployment package.
- LambdaCodeS3Key – The S3 key (path and filename) of the Lambda function deployment package within the specified bucket.
- Select the acknowledgement checkbox, then choose Next, as shown in the following screenshot.
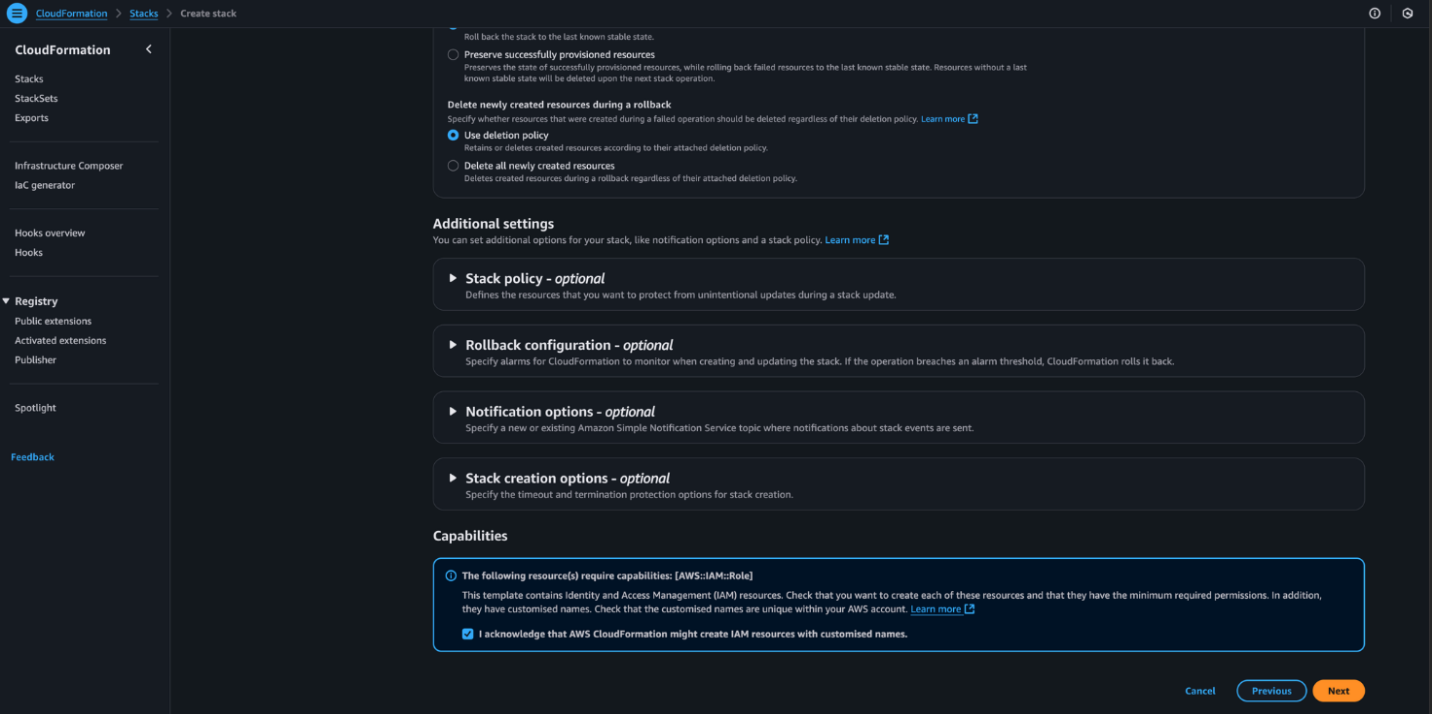
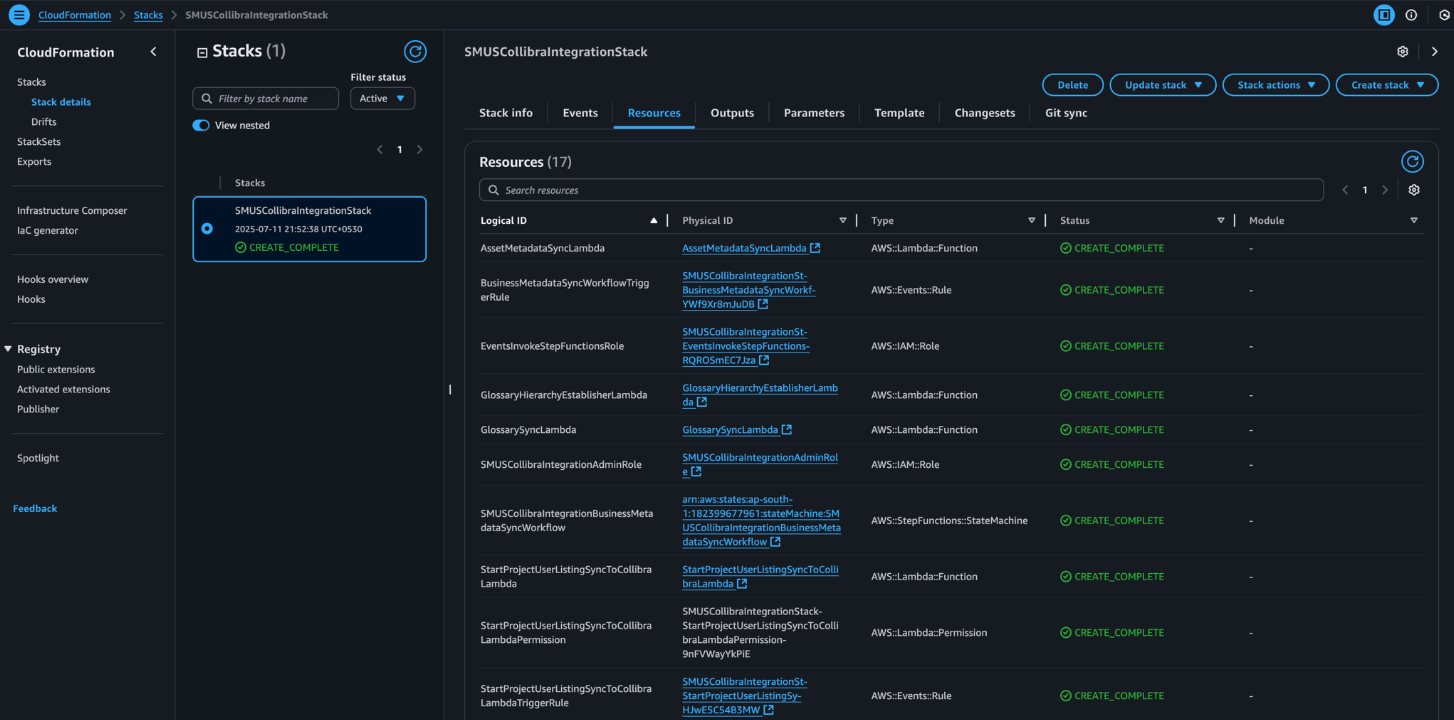
- Choose Submit to start the stack deployment. When the process is complete, the stack status will update to CREATE_COMPLETE.
Configure consumer and producer projects
For this post, only two projects are used: one serving as the producer and one as the consumer. Future versions of the solution are planned to support all projects.
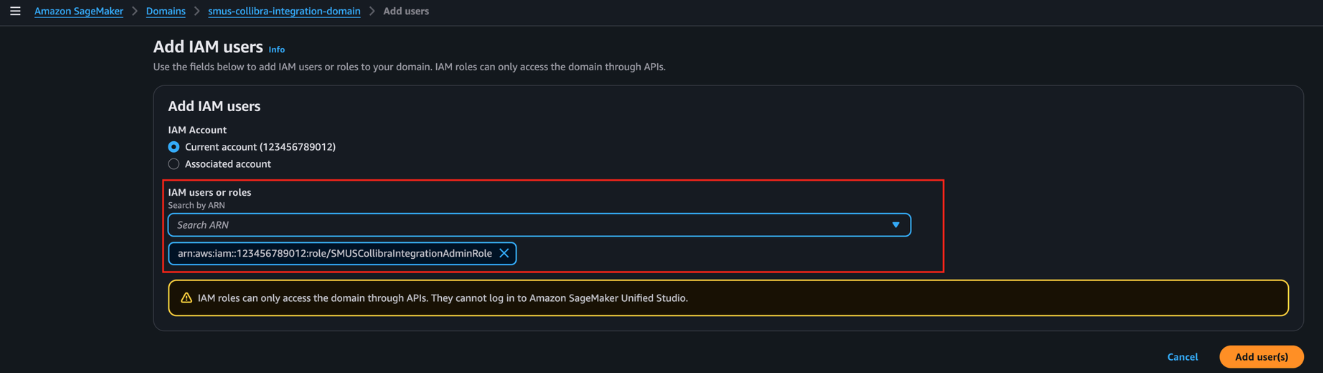
- On the AWS Management Console, go to the SMUS Domain detail page. Under the Users section, choose Add, then select Add IAM users.

- From the dropdown, select the SMUSCollibraIntegrationAdminRole created by the CloudFormation template, then choose Add user(s), as shown in the following screenshot.
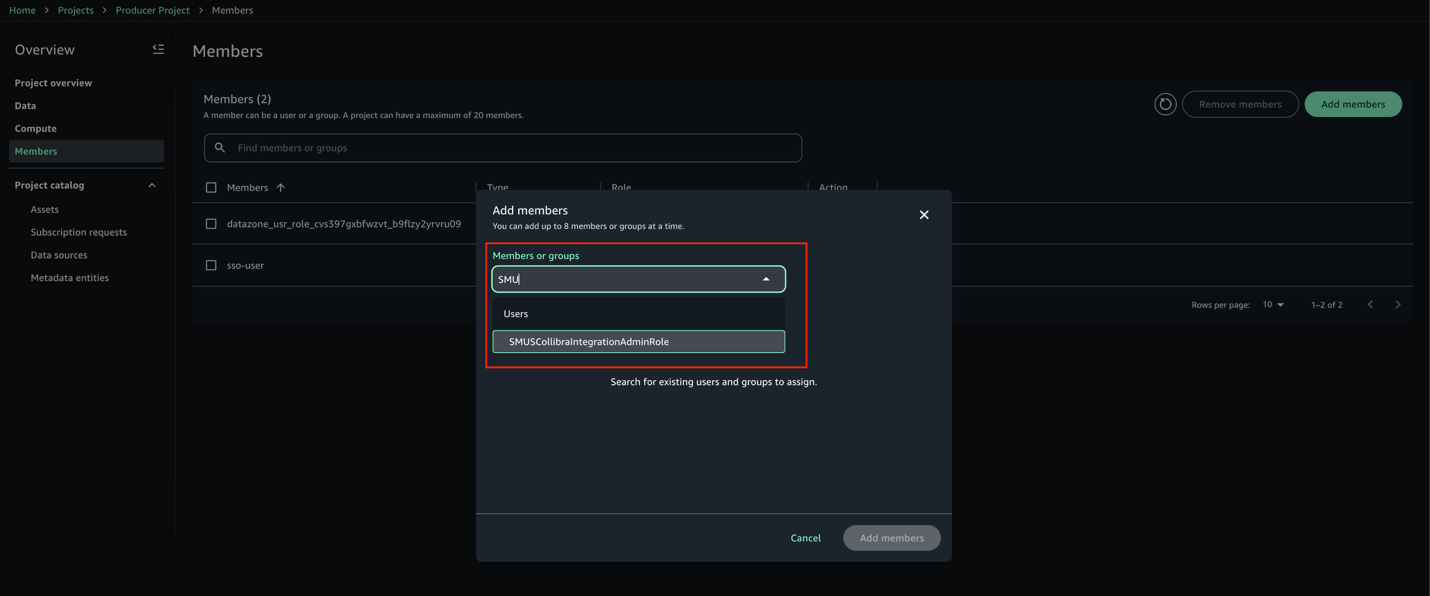
- Open the Unified Studio portal for this domain and navigate to the Producer Project. Go to the Members tab and choose Add members.
- Search for SMUSCollibraIntegrationAdminRole and select it from the results.
- Set the role to Owner, then choose Add members.
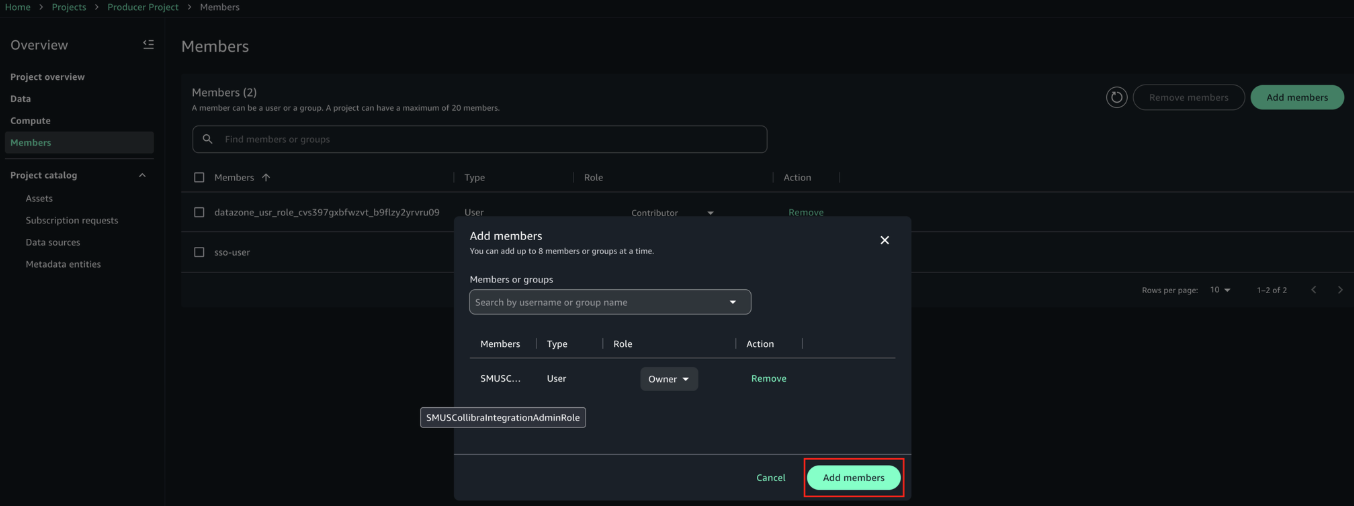
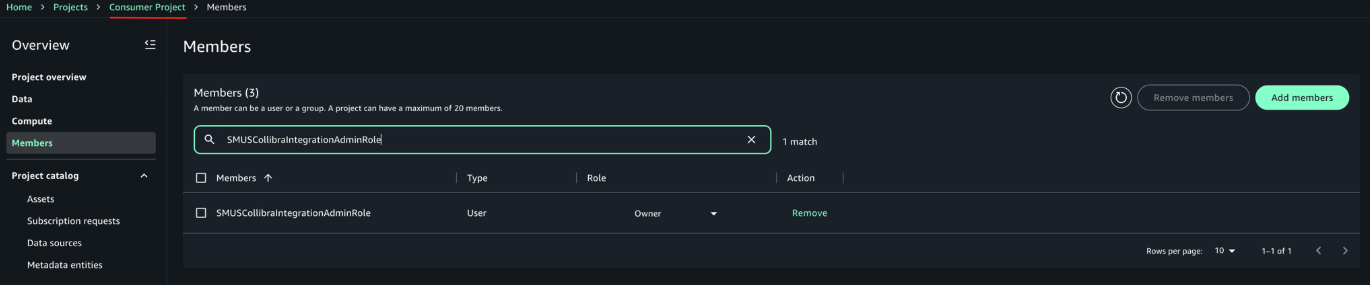
- Repeat the same steps for the Consumer Project. After adding the member, the configuration should look like the example in the following screenshot.
Make sure the producer project has the necessary authorization to create glossary terms in the domain unit it belongs to. For more information, refer to Domain units and authorization policies in Amazon SageMaker Unified Studio in the Amazon SageMaker Unified Studio documentation.
Synchronization of metadata
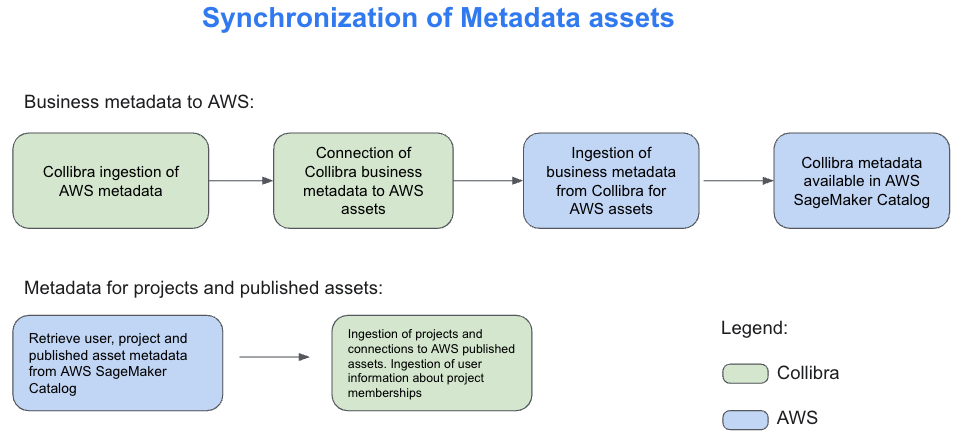
Metadata synchronization between Collibra and SageMaker Catalog happens on two distinct levels, each serving a specific purpose.The first level focuses on technical metadata. Collibra connects to services such as Amazon Redshift and AWS Glue using JDBC and other supported connection methods. Through these connections, it ingests schema details including tables, columns, and data types. This helps technical teams maintain visibility into the structure of the datasets available in SageMaker Catalog.The second level, which is the focus of this solution, handles business metadata synchronization. Using Collibra APIs, SageMaker Catalog retrieves business glossary terms, column descriptions, asset definitions, and the relationships among them. Additionally, Collibra ingests information about SageMaker projects, the assets published within them, and project membership details. This supports approval workflows and helps manage subscriptions based on project-level access. The following diagram illustrates how these two levels of metadata synchronization work together to bridge technical and business perspectives across both platforms.
For the technical metadata ingestion from AWS to Collibra, follow these steps:
- Within the Collibra Edge site, create a new connection for each type of AWS data store you want to ingest metadata from. For detailed instructions, refer to the About Edge and Collibra Cloud site connections in the Collibra Documentation.
- Depending on the type of connection, especially if it’s JDBC, you might need to add a capability such as JDBC catalog ingestion. Refer to the official documentation for more details.
- So the integration works correctly, name all your AWS connections in Edge with “AWS” at the start of the name. The integration script relies on this naming convention to accurately identify assets that originate from AWS.
- In Collibra, go to Catalog, select your connection, configure the rules for your schemas (such as which tables to include or exclude), and run the synchronization. You can also schedule the synchronization to run automatically at intervals defined in the user interface.
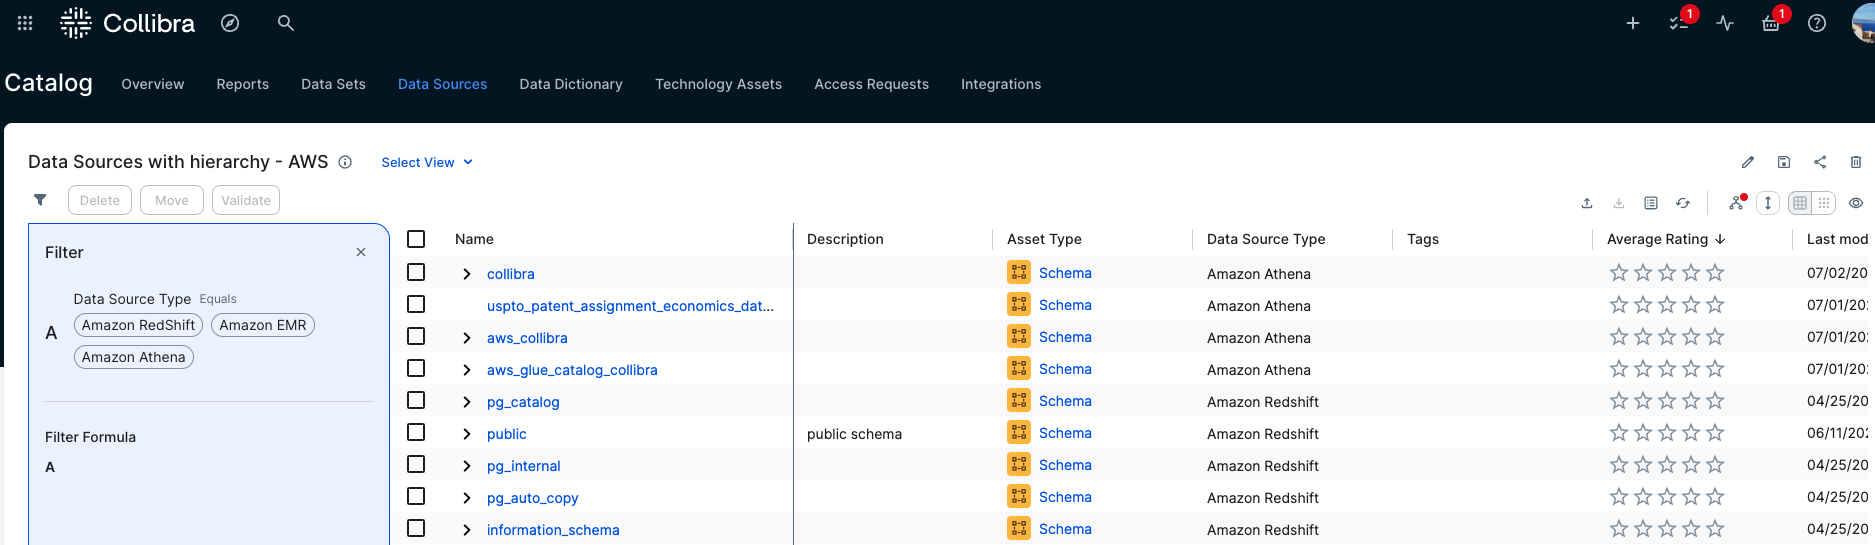
- When metadata ingestion is complete, go to Catalog, then Data Sources. You can optionally filter by a specific AWS source or keep the default view to view all sources. From there, you can review the schemas, tables, and other metadata imported from AWS, as shown in the following diagram.
These data assets are imported using the JDBC connections that are available from Collibra Edge. The AWS solution we present here, in addition to these data assets, will import AWS projects and will link them to the assets ingested here that are published in these projects.
Technical and business stewardship in Collibra
Collibra provides business glossaries to define business context. These glossaries can also include a hierarchy or taxonomy of business terms based on their interdependence. The following is an example of a glossary used for this post.
An Order includes components such as Order Date, Order ID, and others. In Collibra, Business and Technical Stewards are responsible for linking Business Terms to the columns and tables ingested from AWS, as shown in the following diagram. For detailed guidance on how to perform stewardship activities, refer to the official Collibra documentation.
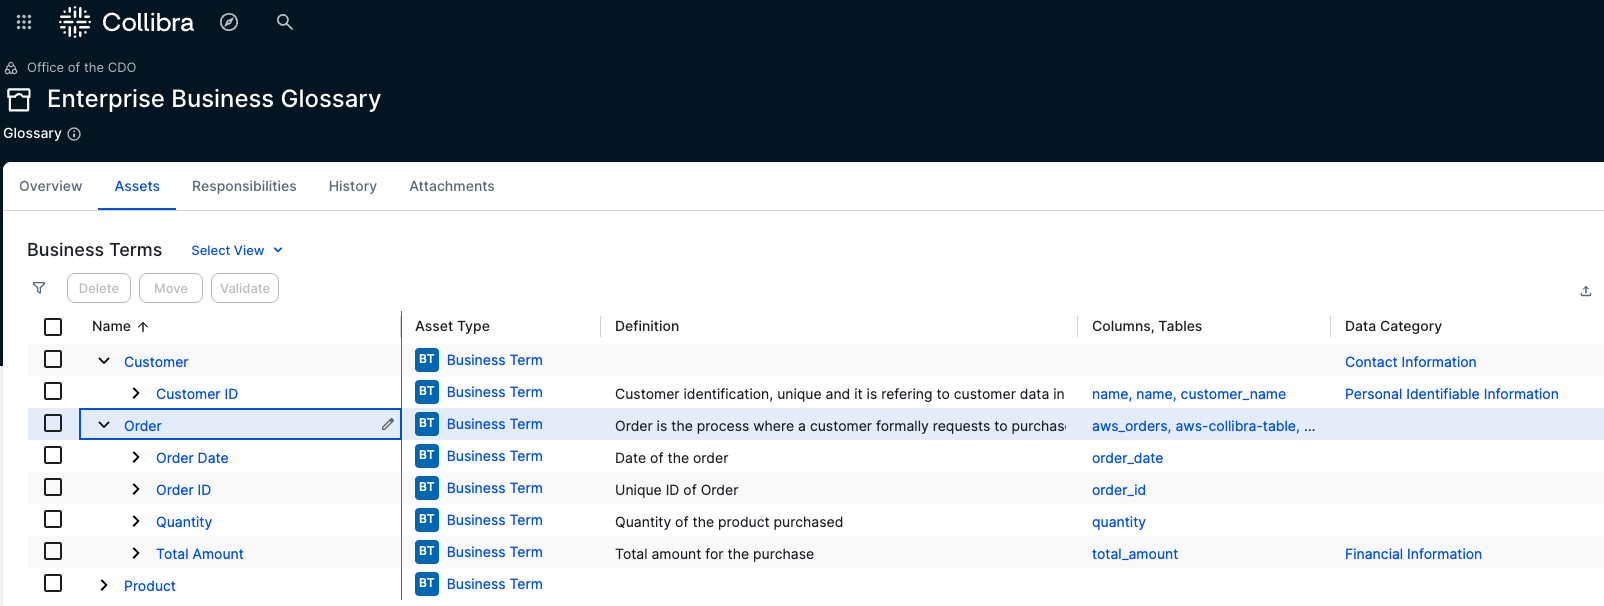
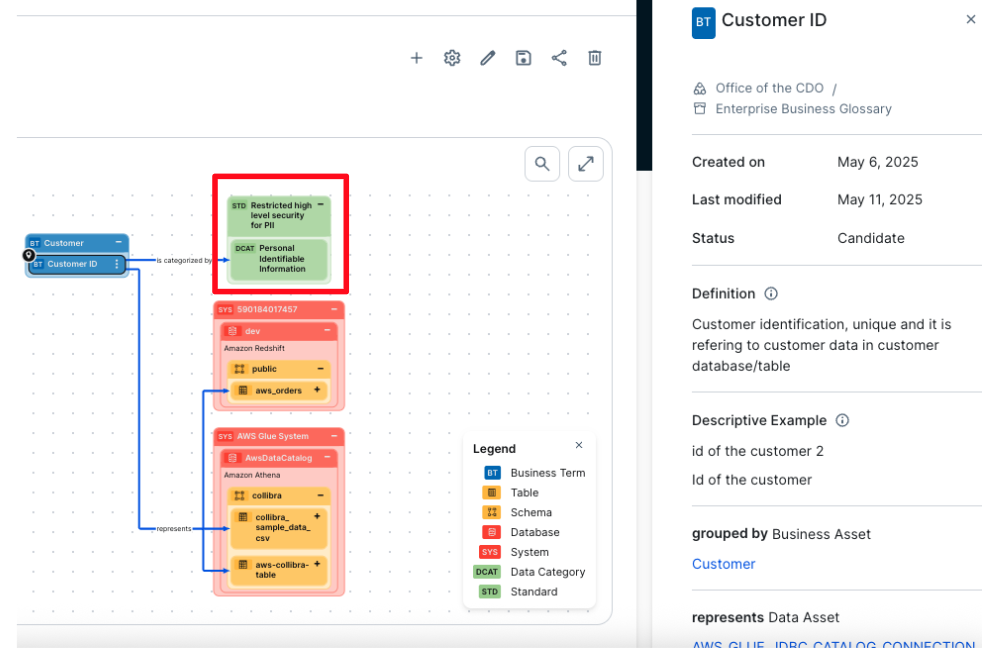
The entire business glossary with its one-level hierarchy is imported into AWS SageMaker Unified Studio automatically with this solution. Some business terms are also linked to data categories that are associated with data privacy, regulatory policies, and standards. In the example in the following screenshot, customer ID is connected to a data category. This connection between business terms and data categories links the associated data to relevant policies and standards. As a result, a table or column connected to a business term that is linked to a data category will also inherit the associated policy or standard.
The business term customer ID is linked to the data category personally identifiable information (PII). With this relation, all columns or tables that are linked to this business term automatically inherit the PII data category, and therefore the policies linked and associated with it.
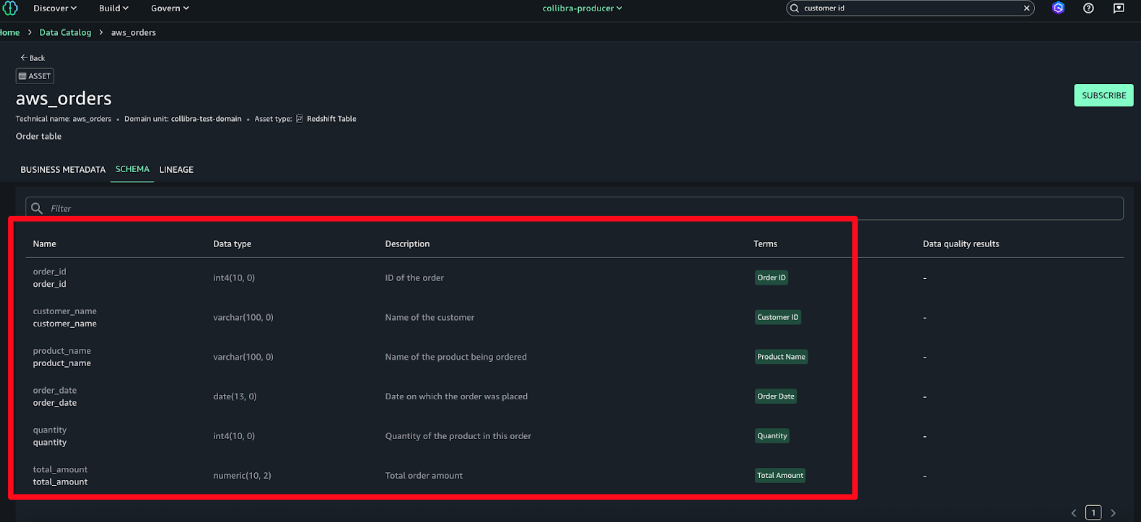
The metadata is imported into AWS SageMaker Unified Studio at the asset and schema levels.
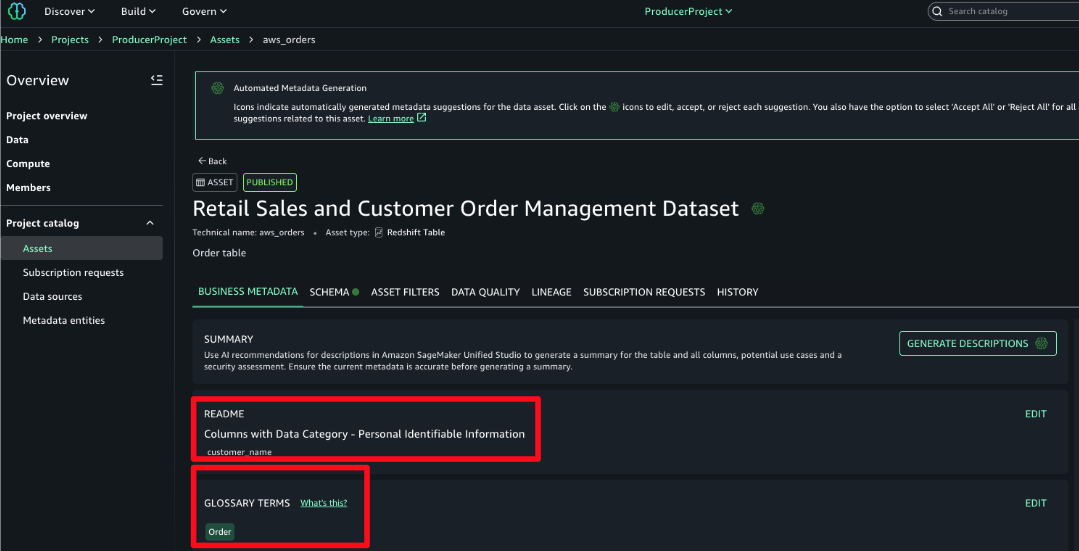
All the business metadata described previously is synchronized with AWS using this solution. Descriptions, data categories, tags, business terms are all imported into AWS and linked to respective assets. In the README, the data category is associated with one of the columns and the business term associated with a table or dataset.From Collibra we import into AWS the following:
- Business terms and their hierarchies and descriptions
- The link of the business terms to the technical assets
- Data category of business terms inherited in the technical assets imported in the README section of the technical asset
- Tags and descriptions of technical data assets
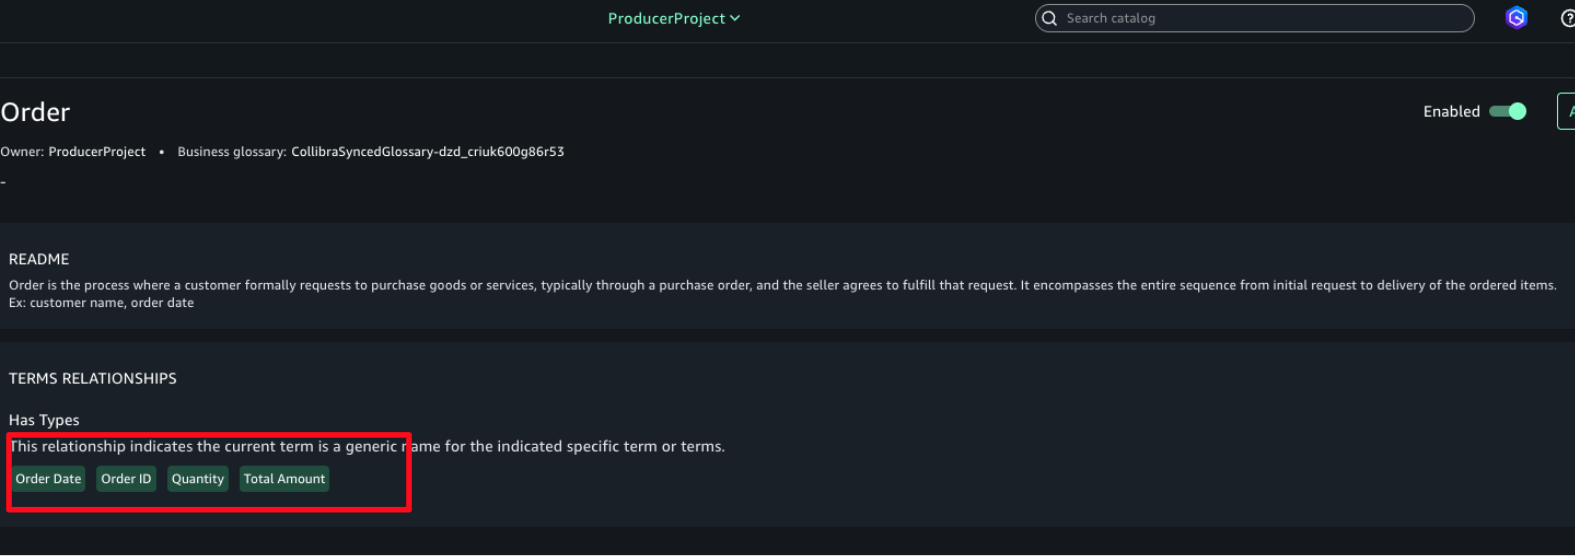
Not only is the business term imported into AWS SageMaker Unified Studio, its taxonomy is imported exactly as it is in Collibra. The following screenshot shows an example where order is imported to have under it the business terms order ID, quantity, and so on.
Subscription to published assets
For the subscription process, the same workflows and series of tasks occur whether the request is initiated from AWS or from Collibra. An overview of these tasks and the end-to-end flow from both platforms is shown in the following diagrams:
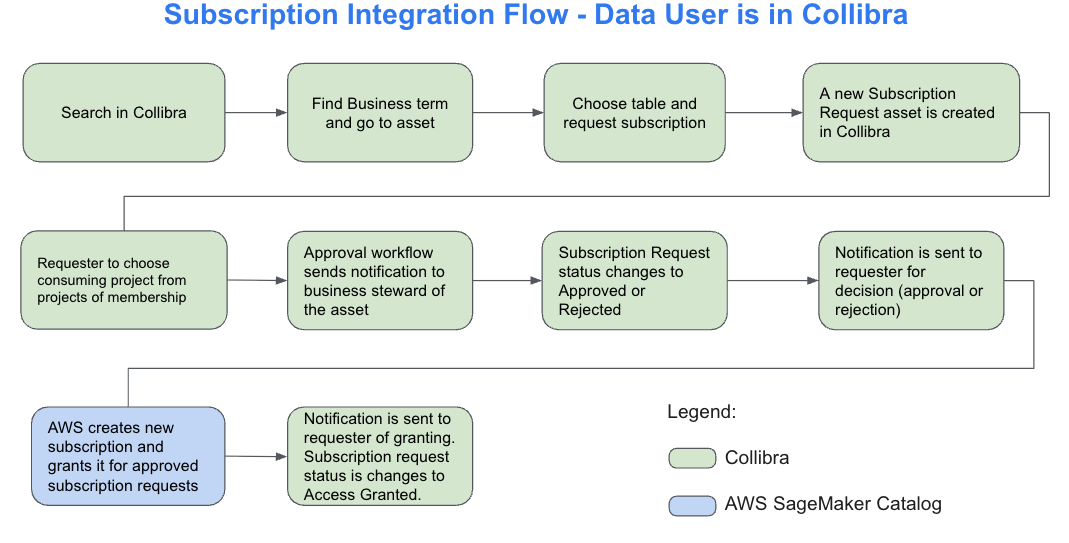
This diagram outlines the subscription request flow when initiated from Collibra. A user searches for a business term, locates the related asset, and submits a subscription request. The system creates a corresponding request asset in Collibra. The user then selects the destination project for the data. An approval workflow is triggered, notifying the designated business steward. If the request is approved, SageMaker Catalog automatically provisions access and updates the request status to Access Granted. The user receives a final notification confirming access. This process provides controlled, transparent data sharing across platforms.
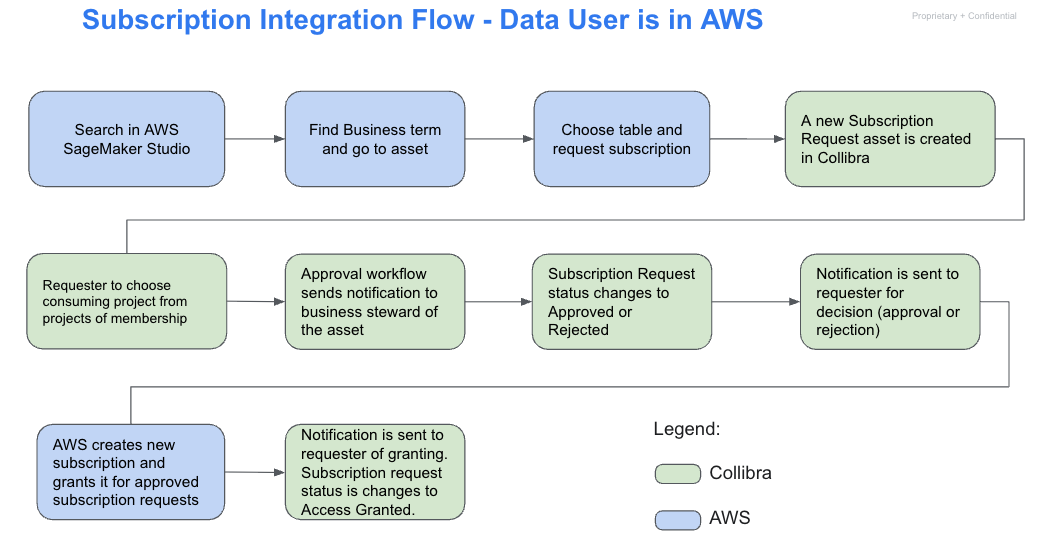
The following diagram illustrates the end-to-end subscription flow when the data user initiates the process from within SageMaker Studio. The user begins by searching for data using a business term and selecting the relevant asset. After choosing the appropriate table, they request access, which triggers the creation of a subscription request asset in Collibra. The user then selects a destination project based on their memberships. Collibra sends an approval request to the designated business steward, who reviews and either approves or rejects it. If approved, SageMaker Catalog automatically provisions the subscription and notifies the requester. The subscription request status is then updated to Access Granted, completing the workflow.
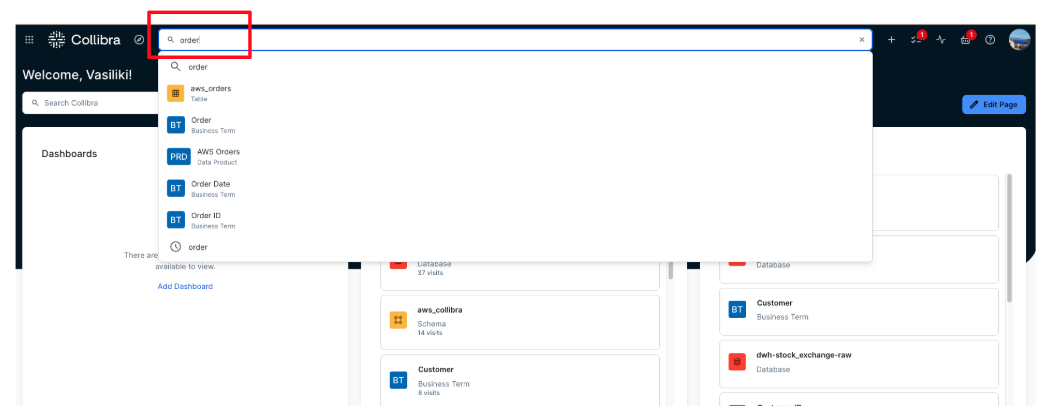
For this post, the process is described starting from Collibra, although it functions the same way if initiated from AWS. In this example, a data consumer is searching for data related to AWS orders using the Collibra interface.
In Amazon SageMaker Unified Studio, the data consumer is a member of the Orders and Products project. At this stage, the user has no active subscriptions or access to data assets. The following screenshot is included to illustrate the state before the integration takes effect.

- In Collibra, navigate to the Search area and enter a business-friendly term describing what the user is looking for. In this example, enter order.
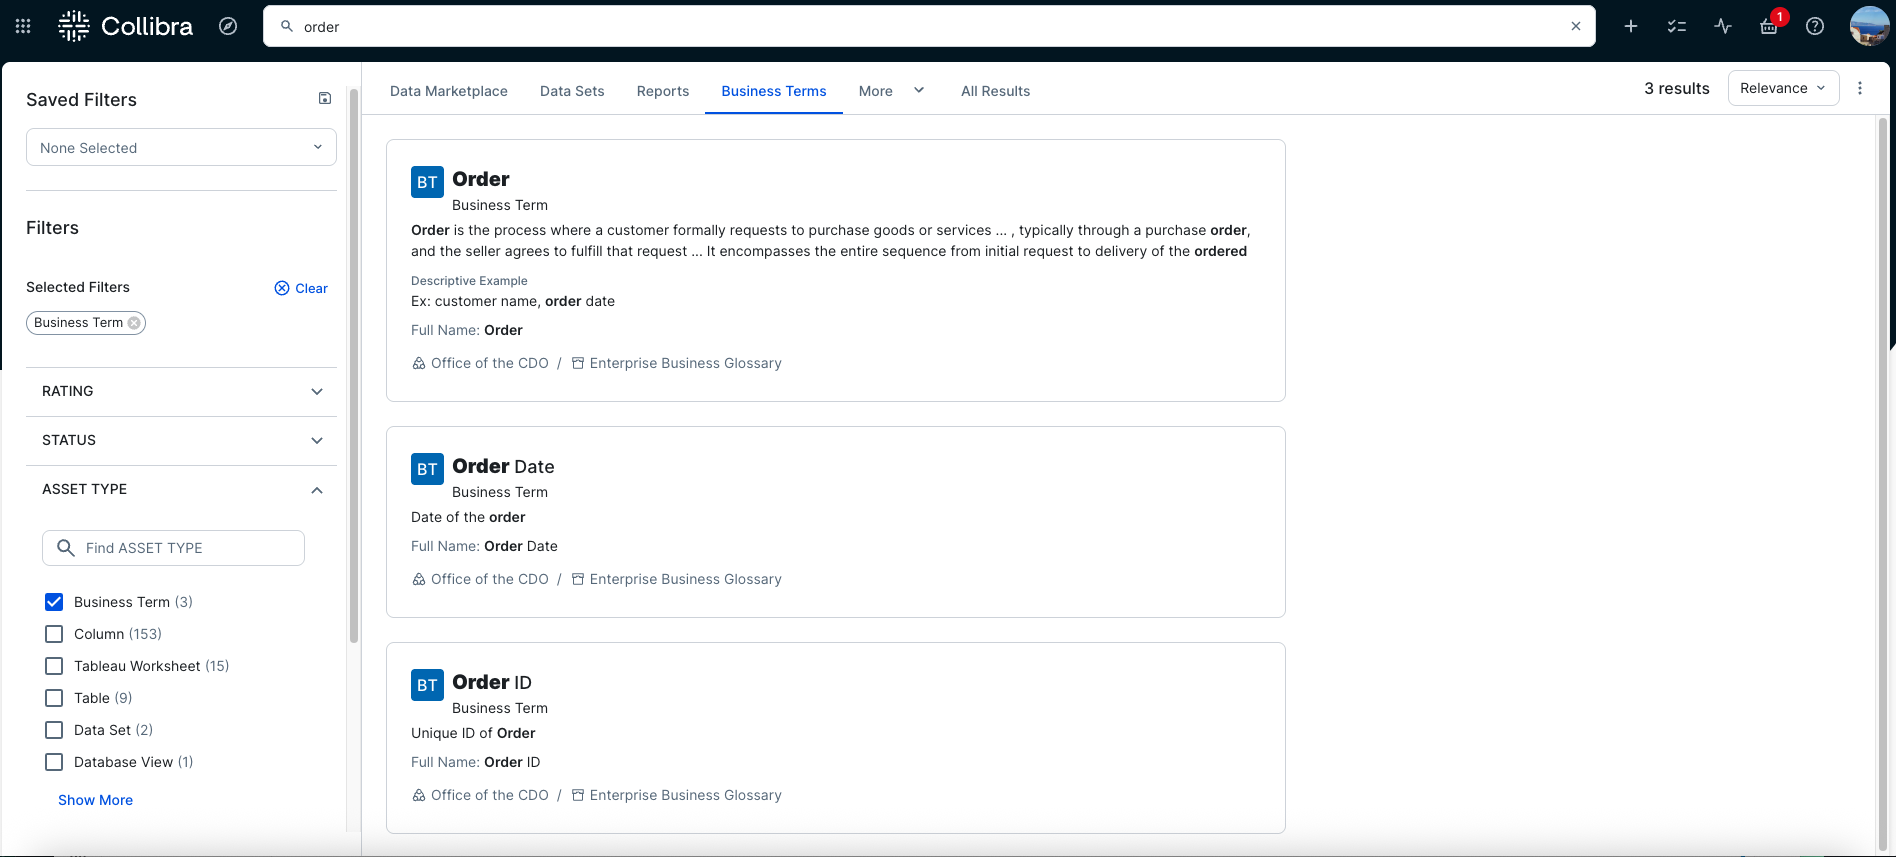
- In the Data Marketplace, filters such as Business Terms can be applied to narrow the results by asset type, as shown in the following screenshot. This approach helps users focus on relevant assets by starting from clear business context, which is especially useful when dealing with many similarly named tables or columns.
- In the example shown in the following screenshot, the business term Order is selected, and the Diagram view is opened to display its full logical lineage. The diagram shows that the term is linked to the aws_orders table. Selecting the table in the diagram reveals its metadata details, which appear on the right side of the page. From there, users can navigate directly to the table.

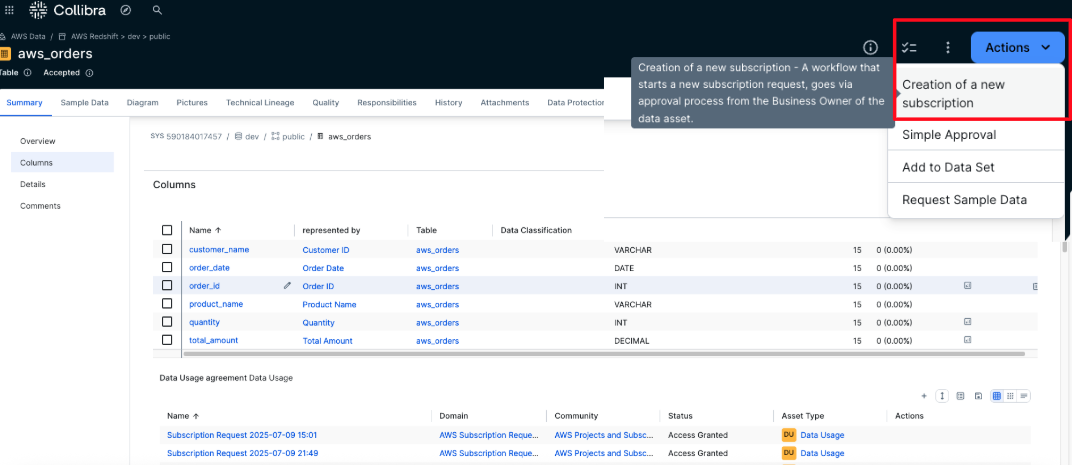
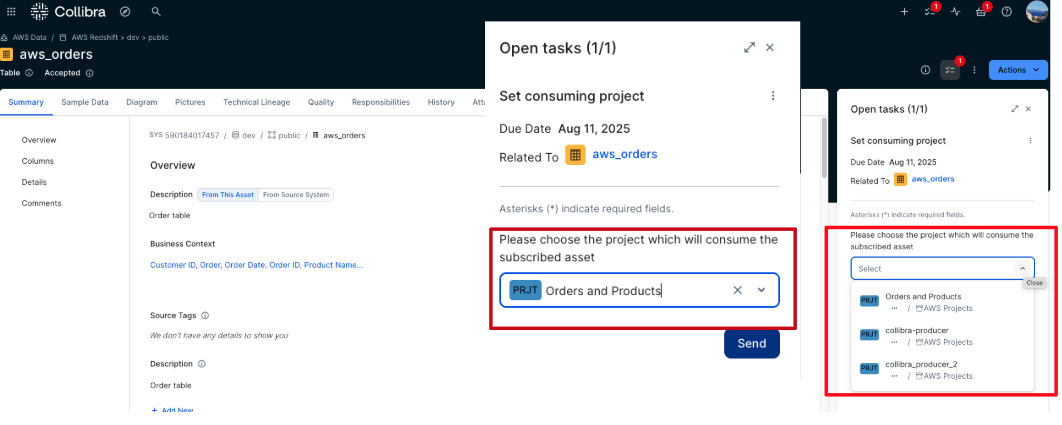
- In the aws_orders table asset, access can be requested by initiating an AWS subscription request. From the asset view, selecting Actions reveals the list of available workflows. In this example, the Creation of a new subscription workflow is selected to start the approval process.
- The user must select the AWS project to use as the consuming project for the subscription. A list of all projects the user is a member of is displayed to facilitate the selection. After choosing the appropriate project, choose Send to submit the request.
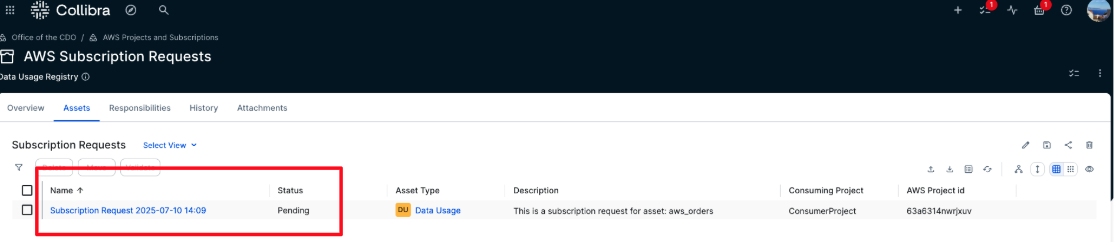
- After it’s submitted, the workflow is triggered, and a task is assigned to the business steward of the asset for which the subscription is requested. A new subscription request is also created in the AWS Subscription Requests domain with a status of Pending, and it’s automatically linked to the requested asset.
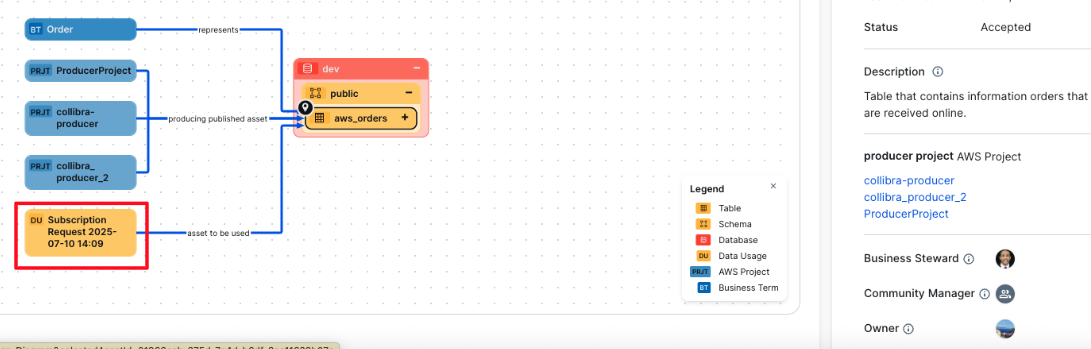
The new subscription request is also reflected in the lineage of the data asset, as shown in the following screenshot.
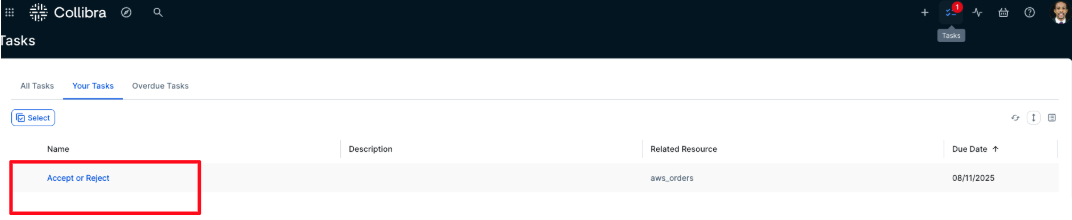
- The business steward assigned to the asset receives an approval notification.
- Choose Tasks button in the top right corner.
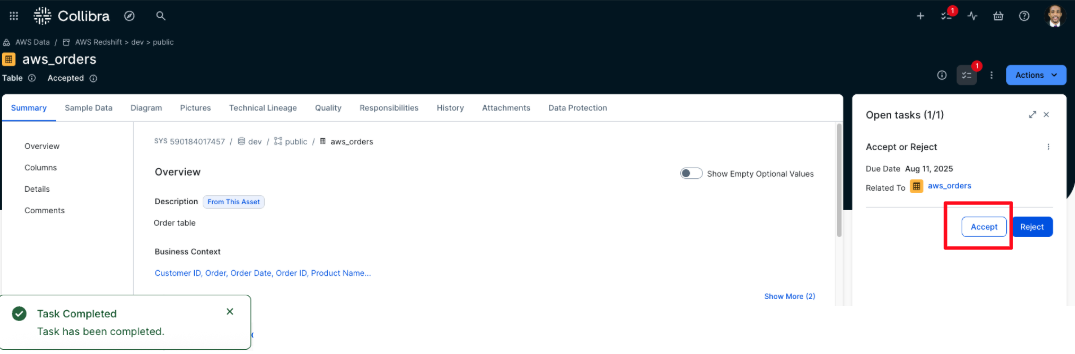
- Locate the most recent task titled Accept or Reject, which is associated with the aws_orders asset.
- The business steward opens the task and chooses either Approve or Reject, depending on the request. In this example, Approve is selected. The task is then marked as complete.
- After the business steward approves the subscription request, the corresponding Subscription Request asset is automatically updated to the status Approved.
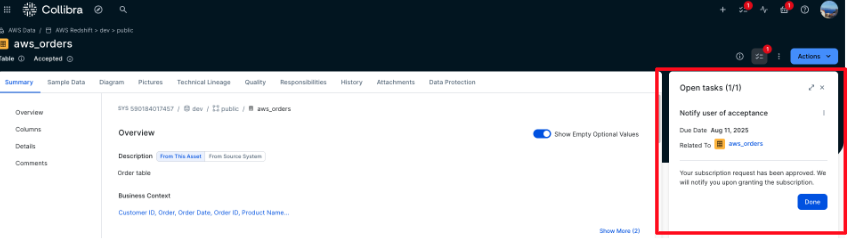
- The requester is notified that the subscription request has been approved. To acknowledge, the requester choose Tasks, locates the approval notification, and chooses Done to confirm receipt, as shown in the following screenshot.

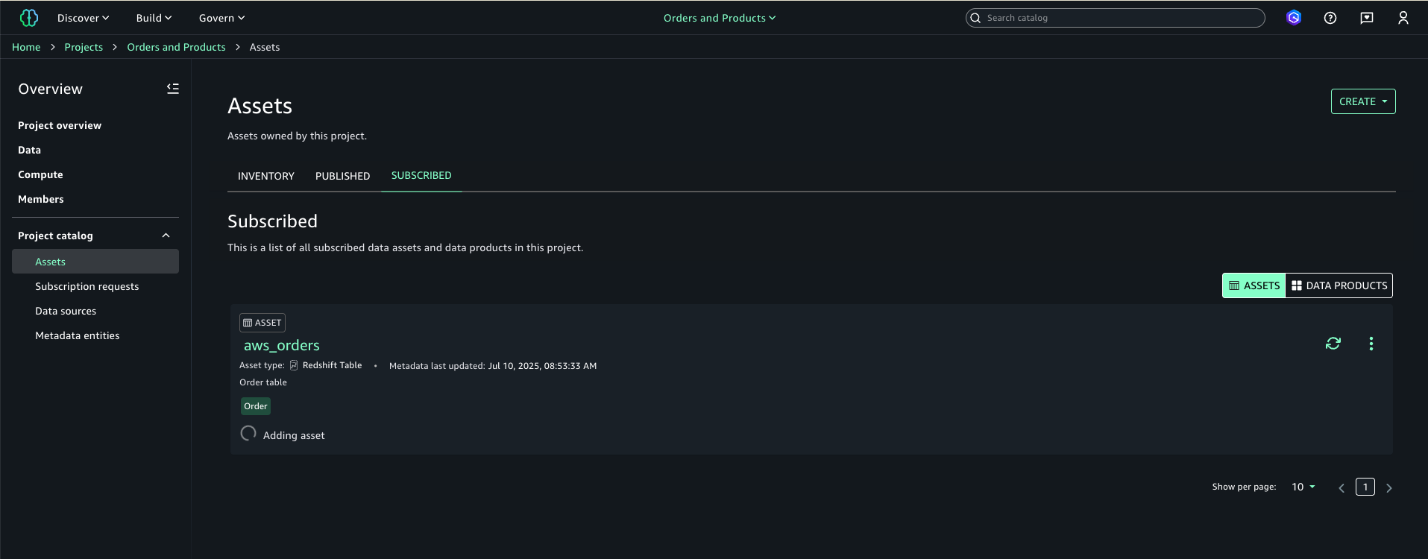
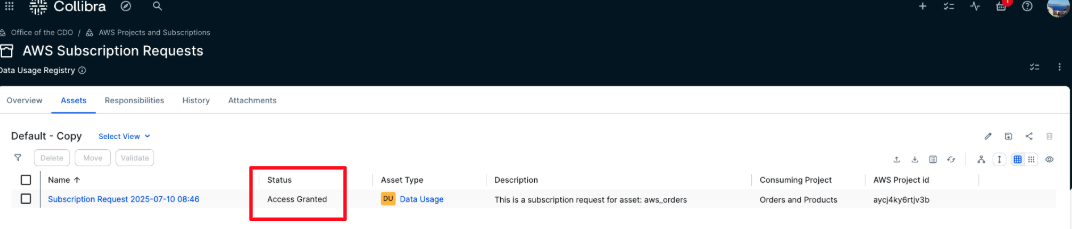
- After a subscription request is approved, the integration solution automatically process the request by creating and granting the corresponding subscription in AWS using the asset’s metadata. The user can then confirm the new subscription is reflected in Amazon SageMaker, as shown in the following screenshot.
- After the subscription is granted, the status of the Subscription Request is updated to Access Granted.
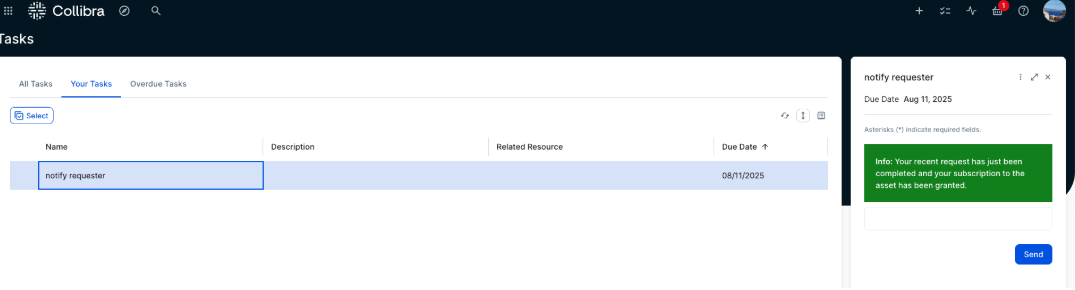
- The requester now receives a new task, which is a notification confirming that the subscription request has been granted. Choose the Send button to acknowledge and complete the task.
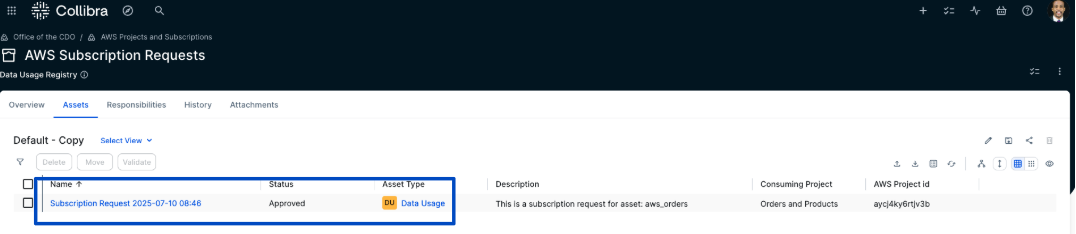
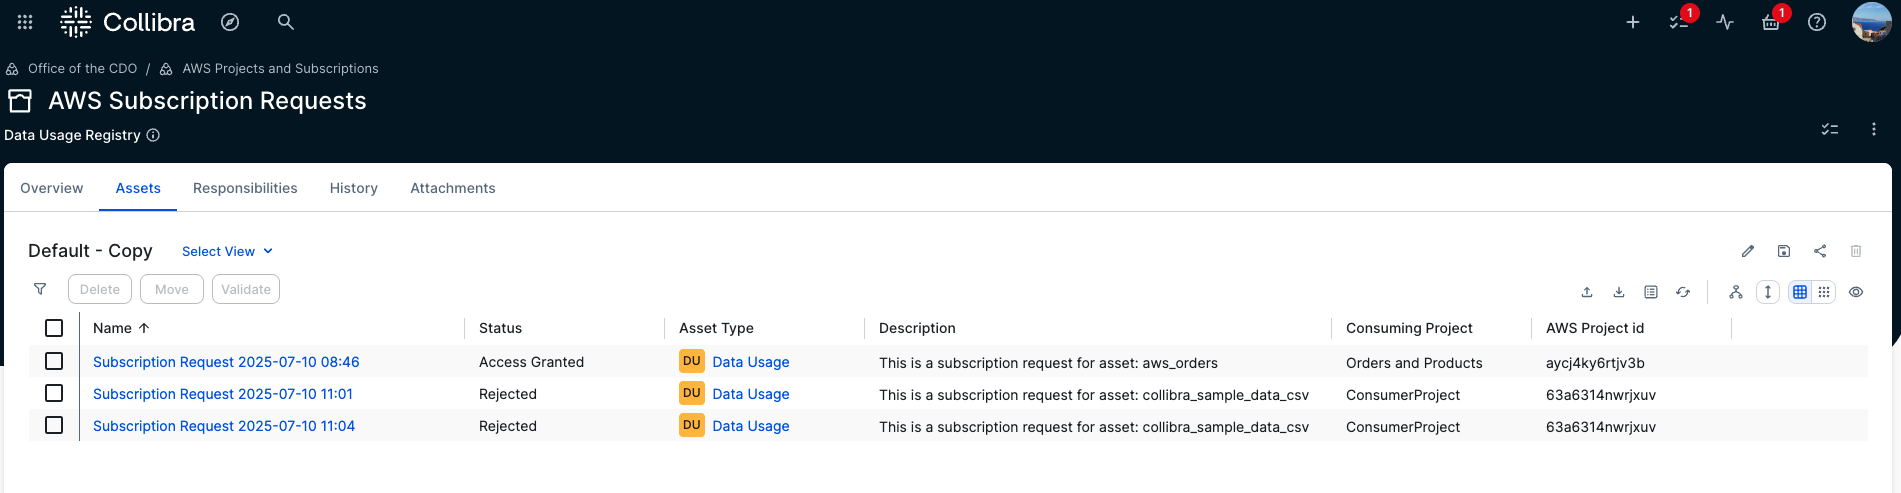
- In the AWS Subscription Requests domain, all requests and their status are visible. In addition to Approved and Access Granted statuses, Rejected requests are also listed. If a request is rejected by the approver, its status changes to Rejected and no subscription is created in AWS.
Synchronization Interval
The solution keeps Collibra and Amazon SageMaker Catalog in sync through regular updates. Core elements including business metadata of Collibra, user profiles, project information & published assets of Amazon SageMaker Catalog, and subscription requests originating in Collibra are synchronized every 5 minutes. However, when subscription requests are created in Amazon SageMaker Catalog, they are instantly synchronized to Collibra.
Cleanup
To avoid incurring unnecessary costs after testing or exploring the solution, delete the provisioned resources. Follow these steps:
- Remove the CloudFormation stack – Go to the AWS CloudFormation console, select the stack you created for this solution, and choose Delete. This will automatically remove the associated AWS resources provisioned by the stack.
- Clean up Collibra configurations – In the Collibra environment, remove test domains, projects, or workflows created for this solution to ensure a clean slate for future experiments.
- Revoke access tokens or credentials – If you used API credentials or access tokens for integration, ensure they’re revoked or deleted if no longer needed.
Performing these steps ensures your environments stay clean and you avoid unintended resource usage.
Conclusion
The solution connecting Amazon SageMaker Catalog and Collibra gives organizations a simple way to unify metadata and streamline access workflows. It helps reduce duplication, improve governance, and build trust in data for both analytics and AI.We demonstrated how to synchronize metadata and manage access requests using APIs, enabling a shared view of data across teams.Learn more by exploring:
We welcome your feedback as you explore what’s possible with this solution.
About the authors
 Vasiliki Nikolopoulou is a Principal Integrations Architect at Collibra, where she is working for the past 11 years. Her extensive career includes roles such as Director, Enterprise Architect at AXA Insurance US, Principal Sales Engineer at Oracle, and Certified Senior IT Professional in technical sales at IBM for over 15 years. She holds numerous technical certifications. Connect with her on LinkedIn.
 Divij Bhatia is a Software Development Engineer at AWS. He is passionate about building resilient and scalable cloud-native solutions that solve real-world problems for customers. His free time often takes him outdoors, traveling and shooting landscapes. Connect with him on LinkedIn.
 Leonardo Gomez is a Principal Analytics Specialist Solutions Architect at AWS. He has over a decade of experience in data management, helping customers around the globe address their business and technical needs. Connect with him on LinkedIn.